Viair Install
 07-02-2011, 06:33 PM
#1
JK Enthusiast
Thread Starter
Join Date: Sep 2009
Location: Fulltime RVer
Posts: 206
Likes: 0
Received 0 Likes
on
0 Posts
Seems like I have been working on this for a long time, but today finally installed the compressor and ran the wires/tubing! The build started with a kit I bought here on the forum (Viair Constant Duty On Board Air System #10007) that was never installed. I immediately bought the Dominion Offroad compressor and tank brackets, thinking I was home free. 
The compressor bracket worked out fine, but I came to find out that the tank brackets were for the 2 gallon tank, not the 2.5 gallon tank that came with the kit. Instead of working around the tank for attachments, I decided to make a bracket that would hold a manifold that would distribute air to where I needed it. I used a 2" wide piece of aluminum from Home Depot and attached it to the DO compressor bracket.

This was all done in my kitchen, since I don't have a garage I got the manifold block from Amazon, as well as the gauge. The misc fittings all came from Home Depot. In retrospect, I should have taken the assembly downstairs for some dry fittings so that I could get a better perspective on the installed components. It worked out OK, but probably would have saved some time moving things around.
The install went pretty well, and only had to remove the assembly once (that is good for me!). Reason for removal: forgot to attach the air intake line before installing. The tube is too stiff to try to get it in there when installed.
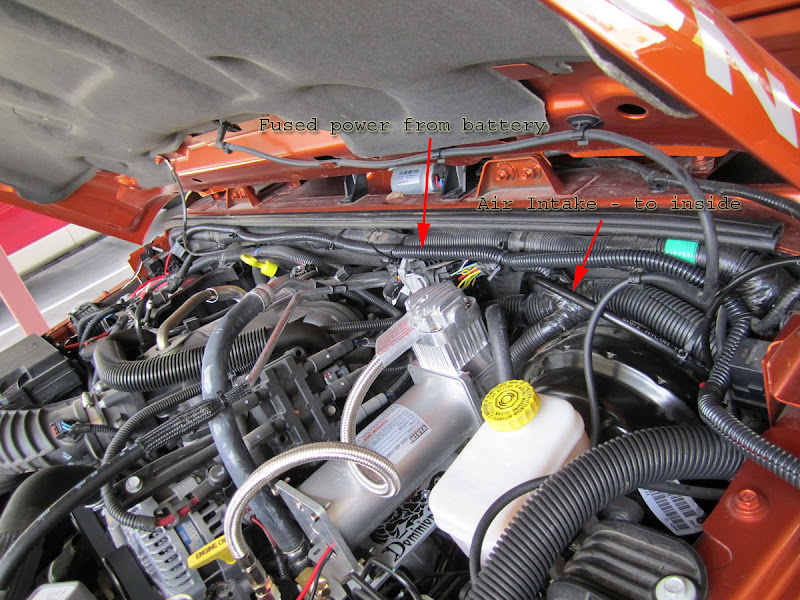
The rest of the engine compartment went pretty smooth. Ran the fused line directly to the battery, and ran the gauge tube, switched power, and air intake into the cab via the unused clutch cable opening. I was thankful for such an easy access for all that stuff!

I have not finished the inside install, as I was planning on using the RR A-Pillar pod, but since I have a 2011, nothing fits as it should, and I had to think about Plan B. Will probably drill out the OE A-Pillar, but looking for a gauge that will fit. However, everything in the cab is ready to go.
I am working on adapting the DO tank brackets to mount to the rollbar in the back, but until I get that put together, I will run the compressor without the tank. Planning on running a line from the manifold to the tank in the rear, then running a line from the tank to the tailgate.
Happy to finally get it out of the kitchen and into the Jeep! Closing out with a poseur pic because I washed her after I finished the install

The compressor bracket worked out fine, but I came to find out that the tank brackets were for the 2 gallon tank, not the 2.5 gallon tank that came with the kit. Instead of working around the tank for attachments, I decided to make a bracket that would hold a manifold that would distribute air to where I needed it. I used a 2" wide piece of aluminum from Home Depot and attached it to the DO compressor bracket.
This was all done in my kitchen, since I don't have a garage
I got the manifold block from Amazon, as well as the gauge. The misc fittings all came from Home Depot. In retrospect, I should have taken the assembly downstairs for some dry fittings so that I could get a better perspective on the installed components. It worked out OK, but probably would have saved some time moving things around.The install went pretty well, and only had to remove the assembly once (that is good for me!). Reason for removal: forgot to attach the air intake line before installing. The tube is too stiff to try to get it in there when installed.
The rest of the engine compartment went pretty smooth. Ran the fused line directly to the battery, and ran the gauge tube, switched power, and air intake into the cab via the unused clutch cable opening. I was thankful for such an easy access for all that stuff!
I have not finished the inside install, as I was planning on using the RR A-Pillar pod, but since I have a 2011, nothing fits as it should, and I had to think about Plan B. Will probably drill out the OE A-Pillar, but looking for a gauge that will fit. However, everything in the cab is ready to go.
I am working on adapting the DO tank brackets to mount to the rollbar in the back, but until I get that put together, I will run the compressor without the tank. Planning on running a line from the manifold to the tank in the rear, then running a line from the tank to the tailgate.
Happy to finally get it out of the kitchen and into the Jeep! Closing out with a poseur pic because I washed her after I finished the install
Last edited by Nomadr; 07-02-2011 at 06:37 PM. Reason: Posted larger pics

 Cant wait to see it finished cause Im definitely getting this kit when the time comes!

Trending Topics
07-06-2019, 08:49 AM
#8
Super Moderator

The manifolds vary. I think mine has an extra port than what's shown so I plugged one off, left one for air tools, ran a line to the tank, another to an aux hookup, one is for tank pressure (to switch it on/ off), and I think there were two gauges- one under the hood and one in the cab. What exactly are you looking for out of a picture?
07-12-2019, 07:51 AM
#9
JK Newbie

Join Date: Feb 2013
Location: Laurel, MD.
Posts: 4
Likes: 0
Received 0 Likes
on
0 Posts
Hello,
I recently did the same setup but my air compressor would come on then off then on again. I have my on/off switch connected to my rocker switch.
Think of any reason why the compressor doing this?
I recently did the same setup but my air compressor would come on then off then on again. I have my on/off switch connected to my rocker switch.
Think of any reason why the compressor doing this?
07-12-2019, 08:23 AM
#10
Super Moderator
There should be a pressure switch that will tell the compressor to come on after you've given it permission to come on (via your switch). Do you have a tank hooked up?