
Homebrew Onboard air system


Thread Starter
JK Enthusiast
Joined: Sep 2009
Posts: 102
Likes: 0
From: New Orleans, LA
So, I've been wanting a onboard air system for sometime now, but could not bring myself to pay $300+ for one, so I made on myself. Heres what I used
Compressor from Harbour Feight- 150PSI
Smittybilt 2.5 gallon air tank
Viair Pressure switch, 85psi on, 105psi off
50' 3/8 hose
Air Check Valve
assortment of fittings
Daystar rocker switch
All in all, total cost was around 130.
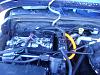
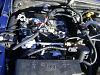
I mounted the air compressor just in front of the battery. I made up a mounting plate of of 3/16 diamond plate, and used the stock battery bolt to bolt it down. Had to rearrange some wires, but nothing serious.
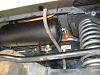
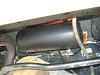
I installed the air tank above the rear axle, and bolted it down through the cargo area with 4 10mm bolts. I plan on getting a bead of weld tacked to it Monday just in case the nuts slack off. On the tank theres a air in/air out, drain, pressure relieve valve (125psi), pressure gauge and pressure switch.
Once all tank and compressor was mounted, I wiring the compressor through a 40 amp relay, and for switches I used the daystar rocker switch in series with the pressure switch. So the daystar acts as a master switch, and once it is turned on, the power the compressor is controlled by the pressure switch.
Next was just a matter of running a few hoses. From the compressor to the tank (all hose run along the frame rails). From the tank to a outlet, which i have inside the cargo area. I ran the hose from the tank, to behind the passenger side tail light, and out through into the cargo area. Also ran a small line into the cargo area for the pressure gauge.
I drew up a quick diagrammatic in CAD for diagram of how I put it all together. I couldn't figure out how to post a PDF, so if you want it, msg me and i'll e-mail it to you.
And thats it.. It was pretty simple to do... took a bit of time, but thats part of the fun... Heres some pics.
Compressor from Harbour Feight- 150PSI
Smittybilt 2.5 gallon air tank
Viair Pressure switch, 85psi on, 105psi off
50' 3/8 hose
Air Check Valve
assortment of fittings
Daystar rocker switch
All in all, total cost was around 130.
I mounted the air compressor just in front of the battery. I made up a mounting plate of of 3/16 diamond plate, and used the stock battery bolt to bolt it down. Had to rearrange some wires, but nothing serious.
I installed the air tank above the rear axle, and bolted it down through the cargo area with 4 10mm bolts. I plan on getting a bead of weld tacked to it Monday just in case the nuts slack off. On the tank theres a air in/air out, drain, pressure relieve valve (125psi), pressure gauge and pressure switch.
Once all tank and compressor was mounted, I wiring the compressor through a 40 amp relay, and for switches I used the daystar rocker switch in series with the pressure switch. So the daystar acts as a master switch, and once it is turned on, the power the compressor is controlled by the pressure switch.
Next was just a matter of running a few hoses. From the compressor to the tank (all hose run along the frame rails). From the tank to a outlet, which i have inside the cargo area. I ran the hose from the tank, to behind the passenger side tail light, and out through into the cargo area. Also ran a small line into the cargo area for the pressure gauge.
I drew up a quick diagrammatic in CAD for diagram of how I put it all together. I couldn't figure out how to post a PDF, so if you want it, msg me and i'll e-mail it to you.
And thats it.. It was pretty simple to do... took a bit of time, but thats part of the fun... Heres some pics.
JK Newbie
Joined: Mar 2009
Posts: 90
Likes: 0
From: Forest Park, IL
Looks really nice, I love these "homebrews" that we all keep coming up with. My only question is, do you have enough room between your diff. and the tank? Looks kind of close from the perspective of the pictures, and if your bump spacing is such you might crush that tank. I'm sure you've taken that into consideration, but I had to mention.
Awesome either way. When I need some air, I'll probably be going a similar route.
Awesome either way. When I need some air, I'll probably be going a similar route.
Thread Starter
JK Enthusiast
Joined: Sep 2009
Posts: 102
Likes: 0
From: New Orleans, LA
I looked at the space issue before i started the install. I took my jeep out and fully flexed it out, both in front and rear, and measured for clearance. BY the measurements i should have no problem with the tank making contact on the diff. It was late this evening when I finished the project and i didn't have time to go and flex out again to do a positive check, but I will tomorrow. I'll take some pics of the clearance and post up.
JK Jedi Master

Joined: Feb 2008
Posts: 12,907
Likes: 185
From: Maine
Another test would be to see if it clears when the axle goes up on both ends, as when both springs are compressed.
Thread Starter
JK Enthusiast
Joined: Sep 2009
Posts: 102
Likes: 0
From: New Orleans, LA
I'll check it to tomorrow and let you know
Trending Topics
Thread Starter
JK Enthusiast
Joined: Sep 2009
Posts: 102
Likes: 0
From: New Orleans, LA
just a follow up. I have flex out my rear axle every way i can think of flexing it, and I have no clearance issues. That being said, I have ever intention on putting in a 1.25" body lift after x-mas. With the tank bolted to the body, that should give me LOTS for the tank.
I have also been thinkin about putting a small skid plate under it, just in case. If i do, i'll post up some pics, and once i figure out the dimensions of the plate, i'll draw is up in CAD for a template.
I have also been thinkin about putting a small skid plate under it, just in case. If i do, i'll post up some pics, and once i figure out the dimensions of the plate, i'll draw is up in CAD for a template.
