
Homemade Jerry Can Mount

Thread Starter
JK Super Freak
Joined: Jul 2011
Posts: 1,567
Likes: 0
From: Goodyear, Arizona
After about a year of looking for a smart, simple, clean, and inexpensive Jerry can mount I decided to make my own. I thought I was onto something when I stumbled upon using the Rampage Hi-Lift Jack Mount for a Jerry can holder like below, however mount the can onto my gate hinges with my spare tire carrier meant having to open and close the carrier and rear gate at the same time as to not damage the Jerry can. I had to find another way.
When I bought the Jeep it had the rear Mopar bumper already. Due to the costs associated with parts, it was cheaper to just get the Mopar carrier since I did not want to do any body drilling. I looked for a mount made by Mopar, but with no luck. I had heard the Rockhard 4x4 bumper had Jerry can mounts that would work with some modification, but I did not want to spend a lot and didn't care for the look. So, I finally decided to make my own mount. I am making a removable mount that holds the Jerry can on the carrier on the passenger side. It will be designed to not interfere with my carrier use, will not interfere with my vision out the rear window, and will not block my tail light.
So, here is what I did. I started with these two items: an old German gas can I purchased at an Army surplus long ago, and a piece of scrap steel I got from work. The other item I need to get is a Jerry can holder.

I first did some grinding on the scrap steel to have it butt up against the carrier.


I decided to take a break and go to the Ace hardware up the street and get some U-bolts to connect the scrap steel and can holder to the carrier. I had to modify them by slightly flattening them, since they needed to be flat and just slightly wider. I wanted them to start off as too skinny so that the mount wouldn't have any slop or play in it. The top one is just as I got it from the store, the bottom one is the modified one.

I then did a quick test fit. I ended up not butting the scrap to the carrier: doing so would give my less of a mounting surface and it would require trimming as to not hit and dent the gate door. The threads will need to be trimmed so that they do not contact the bumper, and I will by using Teflon nuts during final install, or perhaps used to nuts on each thread. I am very happy with the test fit. The mount, even with just one U-bolt, did not budge at all. No rattles, shifting, or flexing. So far is seems to be extremely sturdy. Final mounting will be as close to the spare tire as possible and the metal band for the can holder will be a locking one.


This is where I am at for now. I plan on nicely painting the mount pieces and Jerry Can. I do not have the Jerry Can holder yet, so that will delay me a bit. I figured I would just share what I have...
When I bought the Jeep it had the rear Mopar bumper already. Due to the costs associated with parts, it was cheaper to just get the Mopar carrier since I did not want to do any body drilling. I looked for a mount made by Mopar, but with no luck. I had heard the Rockhard 4x4 bumper had Jerry can mounts that would work with some modification, but I did not want to spend a lot and didn't care for the look. So, I finally decided to make my own mount. I am making a removable mount that holds the Jerry can on the carrier on the passenger side. It will be designed to not interfere with my carrier use, will not interfere with my vision out the rear window, and will not block my tail light.
So, here is what I did. I started with these two items: an old German gas can I purchased at an Army surplus long ago, and a piece of scrap steel I got from work. The other item I need to get is a Jerry can holder.
I first did some grinding on the scrap steel to have it butt up against the carrier.
I decided to take a break and go to the Ace hardware up the street and get some U-bolts to connect the scrap steel and can holder to the carrier. I had to modify them by slightly flattening them, since they needed to be flat and just slightly wider. I wanted them to start off as too skinny so that the mount wouldn't have any slop or play in it. The top one is just as I got it from the store, the bottom one is the modified one.
I then did a quick test fit. I ended up not butting the scrap to the carrier: doing so would give my less of a mounting surface and it would require trimming as to not hit and dent the gate door. The threads will need to be trimmed so that they do not contact the bumper, and I will by using Teflon nuts during final install, or perhaps used to nuts on each thread. I am very happy with the test fit. The mount, even with just one U-bolt, did not budge at all. No rattles, shifting, or flexing. So far is seems to be extremely sturdy. Final mounting will be as close to the spare tire as possible and the metal band for the can holder will be a locking one.
This is where I am at for now. I plan on nicely painting the mount pieces and Jerry Can. I do not have the Jerry Can holder yet, so that will delay me a bit. I figured I would just share what I have...

Thread Starter
JK Super Freak
Joined: Jul 2011
Posts: 1,567
Likes: 0
From: Goodyear, Arizona
UPDATE:
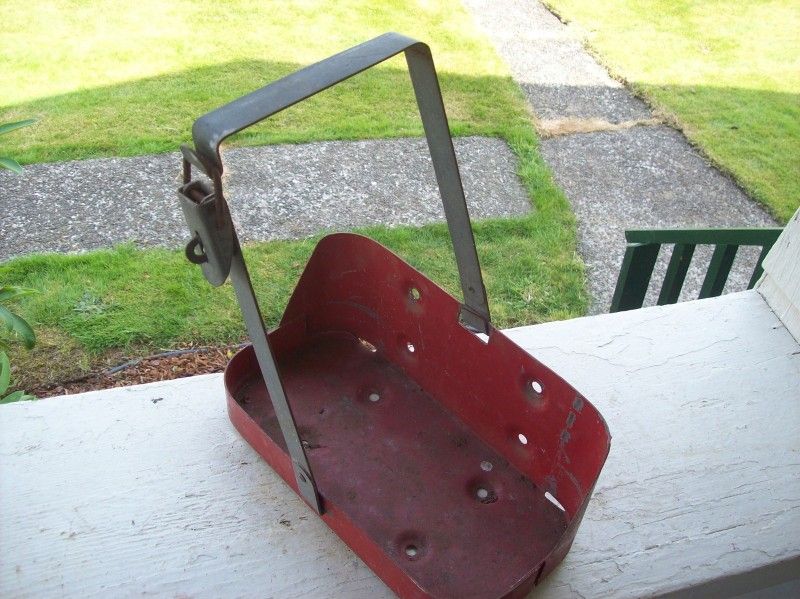
Won an eBay auction this morning for the carrier/strap I posted earlier. I will be sanding and repainting it. Really wanted it due to the ability to put a padlock on it. I was provided a USPS tracking number...but no update yet.
I sanded down part of the can. I got some paint earlier today and sprayed 1/2 of it quickly to see how it would look. I'm a bit concerned that it looks like the green is too bright...opinions appreciated.
Unpainted side:

Painted side:

Won an eBay auction this morning for the carrier/strap I posted earlier. I will be sanding and repainting it. Really wanted it due to the ability to put a padlock on it. I was provided a USPS tracking number...but no update yet.
I sanded down part of the can. I got some paint earlier today and sprayed 1/2 of it quickly to see how it would look. I'm a bit concerned that it looks like the green is too bright...opinions appreciated.
Unpainted side:
Painted side:
Thread Starter
JK Super Freak
Joined: Jul 2011
Posts: 1,567
Likes: 0
From: Goodyear, Arizona
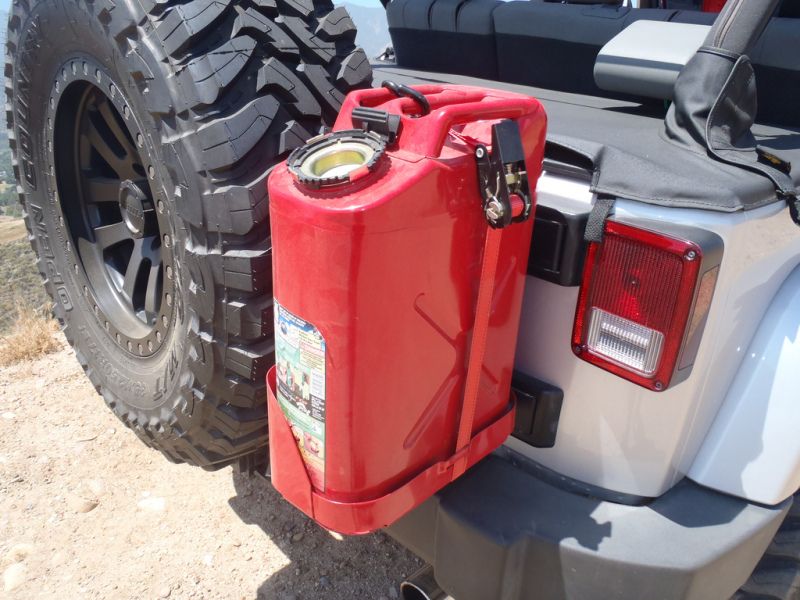
Ok so last night I worked on painting the mounting bracket and the can itself. I know the can is old and dented, so I left the dents for a "seasoned" look. I feel like the new paint really did it justice. The paint on part of the can and the bracket are still tacky, possibly due to the humidity. Once the enamel paint fully dries I will post a mock-up photo to show what it will look like when done, minus the Jerry can mount and strap. The bracket will be attached to the carrier with the Jerry can holder bolted to it. The can will then sit in the holder (which will be repainted) and secured by the metal strap and locked with a padlock.

For those of you curious about the writing on the can, it is in German. It translates to:
Fuel 20L
Flammable

For those of you curious about the writing on the can, it is in German. It translates to:
Fuel 20L
Flammable
Thread Starter
JK Super Freak
Joined: Jul 2011
Posts: 1,567
Likes: 0
From: Goodyear, Arizona
Ok, I bolted the bracket on and then cut some of the threads from the U-bolts so that it wouldn't hit the bumper while closing or scratch it while already closed. Like I said before, I still do not have the Jerry can mount and strap, so the below photos are just to show how the can will look when mounted. It is leaning a bit to the passenger side and towards the back since it is just balancing on the mounting bracket. As you can see it happily does not interfere with my tail light and does not stick out and further than my spare does.


Trending Topics
Thread Starter
JK Super Freak
Joined: Jul 2011
Posts: 1,567
Likes: 0
From: Goodyear, Arizona