
Poison Spyder Rocker Knocker with slider install on a 4 door JK

Thread Starter
JK Super Freak
Joined: Feb 2009
Posts: 1,694
Likes: 2
From: Gilbert, Arizona
So I have to admit that I was in love with these since I first saw them. I already had the factory Rubicon rails but they only provide pinch weld protection and no upper rocker coverage. I also needed something that could act as a step to help my passengers up into the Jeep without them breaking their neck. I am also running a 1" body lift so it was a requirement that my rocker protection mount similar to the Rubicon rail (via the pinch seam) and not mount to the frame. Combine all of those points with wanting something that looks as good as it functions, and you can see why these Rockers are for me (or anyone else with similar needs/wants).
The Rocker Knockers weigh in around 45-50 pounds each and are just about the same length or maybe even a few hairs longer, than the factory Rubi rails.

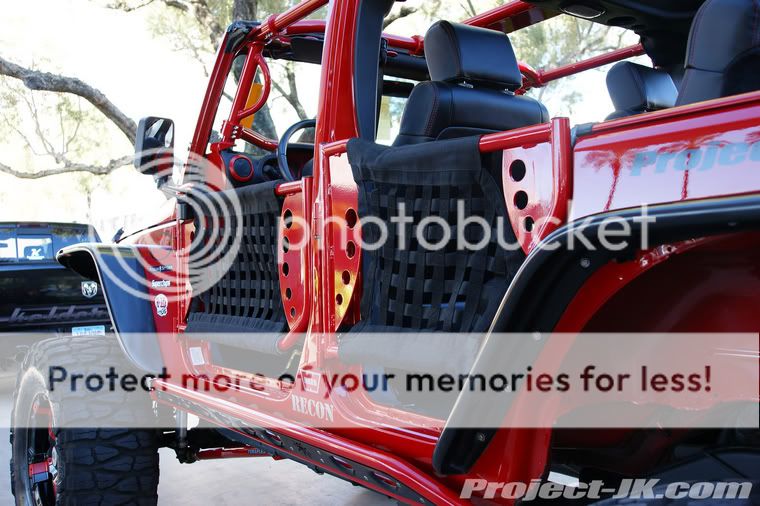
The fit & finish is spectacular. All the welds are top notch and the ends of the main support bar have laser cut caps that are welded and polished smooth. There are gussets welded along the base slider bar, between it and the skid plate. The dimple die cut panel (designed that way to add rigidity) is made out of heavy duty material and is removable via 1/4" stainless steel flat head bolts. There is also a laser cut Poison Spyder logo located on the dimple panel.
There are 2 mounting options for the Rocker Knocker - you can either attach it in the exact same fashion as the OEM Rubi rail (via the pinch seam and 3 body tup bolts) or you can add several more 3/8" stainless bolts into the tub in addition to the OEM mounting points. I chose to mount mine using the severe off-road mount option, so my instuctions below include those steps.
The hardware bag comes neatly packed and seperated by fastener type (pic below). The instruction sheet is inlcuded with the hardware pack or you can jump the gun (like I did) and print the instructions in full color directly from Poison Spyder's website and plan your attack days before you even get them via UPS. Also noteworthy, you don't have to worry about re-using any of your OEM Rubicon hardware except for the rear most bolt. And if you don't have Rubicon hardware, no worries....the nut clip inserts (and bolts) for each hole are already included in the hardware pack. I have heard that the dealer wants $5-$10 per clip for these elusive bad boys.


The tools you will need consist of:
IF YOU HAVE THE OEM RUBICON RAILS:
To remove the rails, simply use a 10mm socket to loosen then remove the 6 nuts that run along the frame side of the horizontal pinch seam. Next use the 13mm socket to loosen the 3 bolts that mount vertically into the bottom of the body tub. Then just pull the rail towards you lifting up ever so slightly as you pull. It helps to have a 2nd person help you though I have removed mine numerous times alone. You will also have to remove the 2 nut clips that are sandwiched in the body tub from where you removed the vertical bolts. The bolt that was closest to the rear tire is actually a part of the tub so leave it where it is.
Next, using the 7/16" drill bit, open up the existing pinch seam holes where the OEM rail was attached. A few of the holes are already large enough so you just need to drill out 3 or 4 of the 6. As per the included instructions, be careful not to let the drill wander. The metal is kind of thin, especially near the bottom of the hole so it is easy to get crazy with the drill. I also used thier tip of elongating the hole horizontaly just in case I needed some room to menuver the rail during install.

Now the instructions say next that if your Rocker Knockers have the optional sliders, that you should remove the dimpled panel. I did this but when it was time to put them back on, I couldn't figure out why I had removed them in the first place. Perhaps this was a step for the 2-dr guys?


Next (and with the help of a friend), hold the Rocker Knockers up to the Jeep, aligning the rails' 6 mounting studs with the 6 holes in the pinch seam, then push the rail in. You may need the rubber mallet to pursuade the rail to fit (another reason to elongate those holes from the previous step).
At this point the Rocker Knocker should be held in place by the pressure the 6 mounting studs make in the pinch seam. To ensure the fitment is precise, have someone (or your free hand) push against the rail completely so that the bottom mounting plate is aligned with the holes already in the bottom of the body tub. You will notice that there are some elongated holes cut into the mounting plate. Using the black Sharpie marker, trace out the holes onto the body tub under the Jeep. Once you have the holes all traced out, pull the Rocker Knocker off the Jeep and set it aside.

The next step in the instructions calls for you to remove some of the end of the pinch seam where the rear tire could possibly make contact with it. I had already done this extensively so I was able to skip this step.
With the Rocker Knocker set aside, center punch each of the ovals you had traced out using the Sharpie. Like I said before, some of the ovals already matched up with a pre-exisitng hole but most of them do not.

Drill the holes out to 1/4" then step it up to 9/16".

Next go to the hardware pack and find 8 but clips. 5 of them will be 'skinny' and 3 of them will be 'fat'. The reason for the size difference is evident when you get underneath and look at the openings in the body tub. Some of the squares are narrow than the others and require the skinnier clips. I also found it useful to use a flat head screwdriver to assist in getting the clips to seat themselves into each of the 9/16" holes you just drilled.


Now line the Rocker Knocker back up with the Jeep and like you did previously and make sure the nut clips you just inserted match up with the pre-exiting ovals in the Rocker Knocker slide plate. If they don't exactly match up, stick a phillips screwdriver of similar size into the hole and wiggle it a bit until everything matches up.
Next, place a 5/16" washer over each of the 6 mounting studs located through the pinch seam then put a 5/16" lock nut on the end. Just finger tighten them all at this point.
Next, insert a 3/8" bolt, lock washer and flat washer into each of the elongated holes along the bpdy tub. All of my bolts came pre-assembled with the washers so just make sure that they follow the correct order on the bolt.
Now go back and tighten the 6 pinch seam bolts using a 1/2" 12-point box end wrench. Torque these to 15 ft/lbs.
Using the 7/32" hex key or allen wrench, tighten the eight 3/8" body tub bolts down to 45 ft/lbs.

There you have it! One side should be all installed so now it's time to move over to the other. I suggest that you completely install the Rocker Knockers when they are bare metal so that you avoid damaging the finish on something other than a rock from the trail.


As you can see from the pic below, my Rocker Knockers completely clear the forward edge of my 40x15.50 tires. Though I did find out that at full stuff, I need to start trimming my rear pinch seam

The Rocker Knockers weigh in around 45-50 pounds each and are just about the same length or maybe even a few hairs longer, than the factory Rubi rails.
The fit & finish is spectacular. All the welds are top notch and the ends of the main support bar have laser cut caps that are welded and polished smooth. There are gussets welded along the base slider bar, between it and the skid plate. The dimple die cut panel (designed that way to add rigidity) is made out of heavy duty material and is removable via 1/4" stainless steel flat head bolts. There is also a laser cut Poison Spyder logo located on the dimple panel.
There are 2 mounting options for the Rocker Knocker - you can either attach it in the exact same fashion as the OEM Rubi rail (via the pinch seam and 3 body tup bolts) or you can add several more 3/8" stainless bolts into the tub in addition to the OEM mounting points. I chose to mount mine using the severe off-road mount option, so my instuctions below include those steps.
The hardware bag comes neatly packed and seperated by fastener type (pic below). The instruction sheet is inlcuded with the hardware pack or you can jump the gun (like I did) and print the instructions in full color directly from Poison Spyder's website and plan your attack days before you even get them via UPS. Also noteworthy, you don't have to worry about re-using any of your OEM Rubicon hardware except for the rear most bolt. And if you don't have Rubicon hardware, no worries....the nut clip inserts (and bolts) for each hole are already included in the hardware pack. I have heard that the dealer wants $5-$10 per clip for these elusive bad boys.
The tools you will need consist of:
- 1/2" 12-point wrench
- 7/16" open end wrench or socket
- 7/32" hex key or allen wrench
- 5/32" hex key or allen wrench
- 1/4" drill bit
- 7/16" drill bit
- 9/16" drill bit
- black sharpie
- center punch (I used a spring loaded version)
- rubber mallet
- 10mm socket (for removing OEM rail hardware if applicable)
- 13mm socket (for removing OEM rail hardware if applicable)

IF YOU HAVE THE OEM RUBICON RAILS:
To remove the rails, simply use a 10mm socket to loosen then remove the 6 nuts that run along the frame side of the horizontal pinch seam. Next use the 13mm socket to loosen the 3 bolts that mount vertically into the bottom of the body tub. Then just pull the rail towards you lifting up ever so slightly as you pull. It helps to have a 2nd person help you though I have removed mine numerous times alone. You will also have to remove the 2 nut clips that are sandwiched in the body tub from where you removed the vertical bolts. The bolt that was closest to the rear tire is actually a part of the tub so leave it where it is.
Next, using the 7/16" drill bit, open up the existing pinch seam holes where the OEM rail was attached. A few of the holes are already large enough so you just need to drill out 3 or 4 of the 6. As per the included instructions, be careful not to let the drill wander. The metal is kind of thin, especially near the bottom of the hole so it is easy to get crazy with the drill. I also used thier tip of elongating the hole horizontaly just in case I needed some room to menuver the rail during install.
Now the instructions say next that if your Rocker Knockers have the optional sliders, that you should remove the dimpled panel. I did this but when it was time to put them back on, I couldn't figure out why I had removed them in the first place.
Perhaps this was a step for the 2-dr guys?Next (and with the help of a friend), hold the Rocker Knockers up to the Jeep, aligning the rails' 6 mounting studs with the 6 holes in the pinch seam, then push the rail in. You may need the rubber mallet to pursuade the rail to fit (another reason to elongate those holes from the previous step).
At this point the Rocker Knocker should be held in place by the pressure the 6 mounting studs make in the pinch seam. To ensure the fitment is precise, have someone (or your free hand) push against the rail completely so that the bottom mounting plate is aligned with the holes already in the bottom of the body tub. You will notice that there are some elongated holes cut into the mounting plate. Using the black Sharpie marker, trace out the holes onto the body tub under the Jeep. Once you have the holes all traced out, pull the Rocker Knocker off the Jeep and set it aside.
The next step in the instructions calls for you to remove some of the end of the pinch seam where the rear tire could possibly make contact with it. I had already done this extensively so I was able to skip this step.
With the Rocker Knocker set aside, center punch each of the ovals you had traced out using the Sharpie. Like I said before, some of the ovals already matched up with a pre-exisitng hole but most of them do not.
Drill the holes out to 1/4" then step it up to 9/16".
Next go to the hardware pack and find 8 but clips. 5 of them will be 'skinny' and 3 of them will be 'fat'. The reason for the size difference is evident when you get underneath and look at the openings in the body tub. Some of the squares are narrow than the others and require the skinnier clips. I also found it useful to use a flat head screwdriver to assist in getting the clips to seat themselves into each of the 9/16" holes you just drilled.
Now line the Rocker Knocker back up with the Jeep and like you did previously and make sure the nut clips you just inserted match up with the pre-exiting ovals in the Rocker Knocker slide plate. If they don't exactly match up, stick a phillips screwdriver of similar size into the hole and wiggle it a bit until everything matches up.
Next, place a 5/16" washer over each of the 6 mounting studs located through the pinch seam then put a 5/16" lock nut on the end. Just finger tighten them all at this point.
Next, insert a 3/8" bolt, lock washer and flat washer into each of the elongated holes along the bpdy tub. All of my bolts came pre-assembled with the washers so just make sure that they follow the correct order on the bolt.
Now go back and tighten the 6 pinch seam bolts using a 1/2" 12-point box end wrench. Torque these to 15 ft/lbs.
Using the 7/32" hex key or allen wrench, tighten the eight 3/8" body tub bolts down to 45 ft/lbs.
There you have it! One side should be all installed so now it's time to move over to the other. I suggest that you completely install the Rocker Knockers when they are bare metal so that you avoid damaging the finish on something other than a rock from the trail.
As you can see from the pic below, my Rocker Knockers completely clear the forward edge of my 40x15.50 tires. Though I did find out that at full stuff, I need to start trimming my rear pinch seam
Thread Starter
JK Super Freak
Joined: Feb 2009
Posts: 1,694
Likes: 2
From: Gilbert, Arizona
What's funny is I was at a show this weekend and saw a pair of prototpe rockers with sliders from another manufacturer. They attached using just the OEM rubi rail mounting points plus five or six 1/8" bolts into the vertical Jeep tub. A buddy and I grabbed onto the slider and moved the Jeep up and down from it. I could see the panel flex under just my body weight so I could imagine what the full 6k-7k pound weight of the Jeep on a rock would do! 

JK Enthusiast


Joined: Sep 2006
Posts: 185
Likes: 0
From: Parker, Co
JPTwinz, I am almost ready to buy these sliders, but can you post a picture from the top looking down so I can see how much extends past the body. I want protection but I definitely need a step for my wife and kids. That's the only reason I still have the stock Sahara steps still one. The reality is, my Jeep is my daily driver and I don't want it to be a pain in the ass for my family to get in and out. Thanks!
Thread Starter
JK Super Freak
Joined: Feb 2009
Posts: 1,694
Likes: 2
From: Gilbert, Arizona
JPTwinz, I am almost ready to buy these sliders, but can you post a picture from the top looking down so I can see how much extends past the body. I want protection but I definitely need a step for my wife and kids. That's the only reason I still have the stock Sahara steps still one. The reality is, my Jeep is my daily driver and I don't want it to be a pain in the ass for my family to get in and out. Thanks!

Trending Topics
JK Enthusiast
Joined: Sep 2006
Posts: 185
Likes: 0
From: Parker, Co
Thanks for the side pictures, it looks like it'll be a good-enough step for the family, I'm only on 35"s so they only need a little ledge to step on. thanks again! And your Jeep looks better and better all the time. I can't believe you've had it under a year and it looks like that! I wish I had the time and money!
Thread Starter
JK Super Freak
Joined: Feb 2009
Posts: 1,694
Likes: 2
From: Gilbert, Arizona
