Smitybilt XRC Armor Front Fenders and Rear Corner Guards

Thread Starter
JK Enthusiast
Joined: Jun 2009
Posts: 106
Likes: 0
From: Bentonville, AR
I finally bit on the smittybilt XRC front fenders and rear corner guards. I had heard they had some backorder issues (my buddy waited 7 months for his rears!), but I ordered mine last week from 4wheelparts and received them 4 days later! I was pleasantly surprised. Talking to a cust service rep it sounds like they resolved their issues meeting demand.
This is not a write up per se, but I found that aside from the original installation instructions, there's not a whole lot out there regarding consumer feedback, installation tips, etc so I thought I would throw my 2 cents in here.
There are several areas to consider when looking at these upgrades:
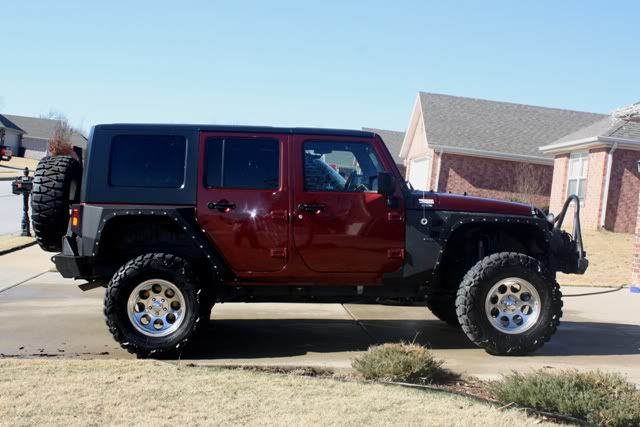
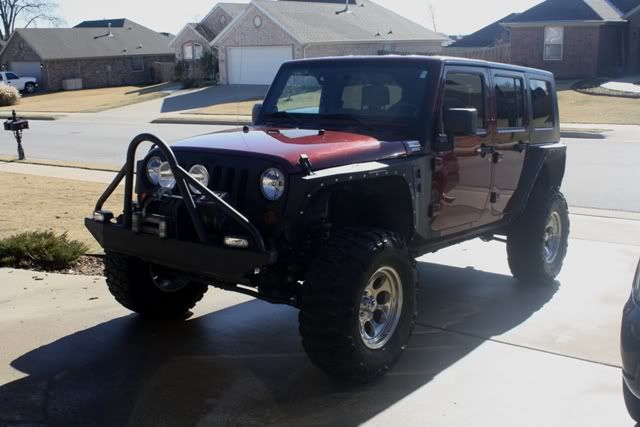
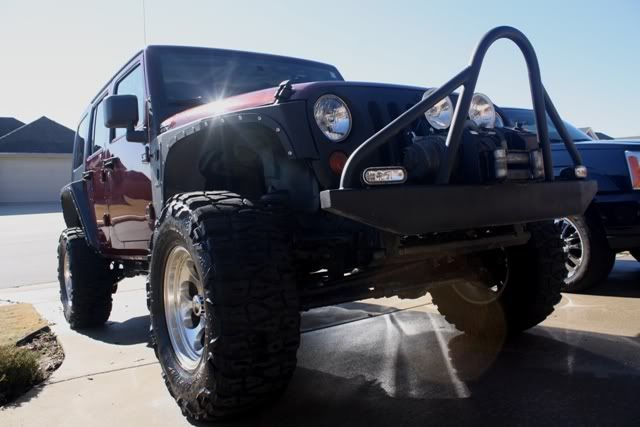
Style and Construction- Obviously this style does not suit everyone. I happen to really like both the form and the function. As for construction, they are made of 3/16" steel which is much much thicker than the OEM fenders. I was actually surprised out how thin the original fenders were. That said, these will add weight to your rig since they are much more beefy. One thing I did not anticipate was how much the new wheel well clearance dwarfs my tires. I am running 35" tires and they look almost stock now due to scale of the fender.
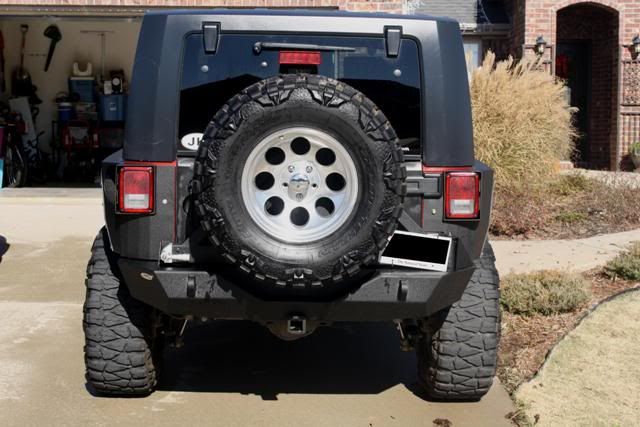
Legality- check ww w.liftlaws.com and your local laws to see what is or isn't allowed with regards to tire coverage and fenders. There is almost no coverage on the front and just a few inches on the rears. I happen to live in Arkansas where there is a little more wiggle room than other states.

Commitment- Consider these permanent upgrades since you will be doing some decent modifications to accommodate installation. For instance, you will be eliminating your front OEM quarter panel all together and cutting off your front fender bracket (for the fronts) and drilling several holes in the rear quarter panel (for the rears). I suggest contacting Smittybilt for the installation instructions before making your decision so you have an idea of everything that is in store. They e-mailed me the instructions before my purchase which was very helpful in making my decision.
Time- You will need a LOT of time to install these. It took 2 full days for me to put on the fronts (by myself) and 2 full days to put on the rears (with help). I consider my skill level to be bolt-off and bolt-on so I figure someone more skilled with help could move faster, but it is still time consuming.
Help Needed- I was able to to do the fronts by myself and they bolted on with no issues. A helper would have saved time though. For the rears a helper is a must as these are not simply bolt on. You will be doing a lot of fitting, marking and drilling. These corner guards are cumbersome and awkwardly shaped so you will need someone there to help hold as you line up for marking, drilling holes, installing nutserts etc.
Fit (Front)- I was very surprised that the fit for the fronts was for the most part a bolt on type of installation. The biggest time sink comes from having to remove and reinstall several other pieces (cowls, windshield brackets, front grill, side steps, etc) just to get the OEM fenders off. The installation of the inner liner is a different story. This part can be a real PITA. In fact, I actually broke my passenger side inner fender trying to get it to fit. Patience and a dremmel are strongly suggested as getting the new inner liner to bend correctly to the new fender can be quite frustrating. Also, once completed you will no longer have a spot for your side marker lamp.
Fit (Rears)- The installation of the rear corner guards was quite a bit different as they are bolted directly on the the tub using holes you drill. Again make sure you have help and take your time to ensure you have everything lined up when making your marks for drilling. The instructions call for C-clamps to help hold the fender once in place (to help in marking drill holes) but we had trouble finding good places where we could use the C-clamps. We ended having one of us hold the fender as we made our drill marks. Once the holes are drilled you then install "nutcerts" (aka rivet nuts). My suggestion is to try and pick up a rivet nut tool on the cheap if possible. Supposedly Harbor Freight sells one. I had no experience with these before, but basically they work like a rivet, but then you are able to screw a bolt into it. A rudimentary tool is supplied but we ended up breaking both of them due to amount of toque we were putting on them to get the rivet nuts installed. Later we found WD40 made the process much much easier. If you run into trouble you are best to use the term "rivet nut" and not nutcert in your google search...as with the fronts, the inner liner can be a PITA.
Instruction Quality- We found the instructions to be straight forward for the installation process, but did lack some details when it came to initial tear-down. Below are some of the missing pieces:
- You will be pulling off your antenna, but finding out how to disconnect the wire inside took some research. For this you need to take off your glove box and try to find the antenna wire hidden somewhere behind the front speaker. When reattaching, you will be feeding the detached wire back through the external hole into the jeep. This hole is found in this same area behind the speaker and can be a major pain when it comes to trying to find the wire to reattach.
- Taking off the front fender... The instructions simply state to remove your front fender. You will need to determine where all the screws are located yourself and this does take some time and searching. You will also need to remove side steps or rock rails for this install and possibly your rear bumper. It will be up to you to figure this out do to all the variations and designs out there.
- I did find one mistake in the reinstallation of the side cowls. Originally you drill out the spot welds holding the side cowls in with a 1/4" drill bit and are given self tapping screws to reattach the cowl once you are finished, however the self tapping screws are only 3/16" and too small for the holes you drilled. We fixed this by picking up a pack of nuts and bolts instead
Tools needed:
- Both Standard and Metric wrenches and sockets (10mm and 13mm get used a LOT)
- Torx set covering both small and larger sizes
- Allen wrench set
- dremmel with cutting wheel
- handled pry bar (for pulling the plastic inner fender clips)
- Rustoleum truckbed liner (optional for spraying some of the newly exposed areas of the wheel wells when completed)
- mallet (to help with stubborn plastic inner fender clips)
- grease pen or marking tool for marking drill holes
- Electric drill since you are drilling into metal and drill bits (3/8 and 1/2 are used for sure)
Overall impression- I am very pleased with my purchase. The construction quality is impressive as well as the fit. The time needed to install was a little more than I anticipated, but again we're talking about full fender replacement and bolt on corner guards so not totally unreasonable. As someone who is limited in my skillset and resources, I found these to be an excellent way for someone like me to gain a heavy modified look/function without having to seriously modify my jeep. The most annoying part of the install was working the inner fenders and installing the nutserts (rivet nuts). Beyond that our install was pretty much uneventful.
One suggestion I have for the manufacturer is to look into creating some type of easy bolt on flare to help with tire coverage when not on the trail. There's 16 exposed bolts on each corner and it seems like this could be something easy to fab up for those who want the best of both worlds.
Hope this helps!
This is not a write up per se, but I found that aside from the original installation instructions, there's not a whole lot out there regarding consumer feedback, installation tips, etc so I thought I would throw my 2 cents in here.
There are several areas to consider when looking at these upgrades:
Style and Construction- Obviously this style does not suit everyone. I happen to really like both the form and the function. As for construction, they are made of 3/16" steel which is much much thicker than the OEM fenders. I was actually surprised out how thin the original fenders were. That said, these will add weight to your rig since they are much more beefy. One thing I did not anticipate was how much the new wheel well clearance dwarfs my tires. I am running 35" tires and they look almost stock now due to scale of the fender.
Legality- check ww w.liftlaws.com and your local laws to see what is or isn't allowed with regards to tire coverage and fenders. There is almost no coverage on the front and just a few inches on the rears. I happen to live in Arkansas where there is a little more wiggle room than other states.
Commitment- Consider these permanent upgrades since you will be doing some decent modifications to accommodate installation. For instance, you will be eliminating your front OEM quarter panel all together and cutting off your front fender bracket (for the fronts) and drilling several holes in the rear quarter panel (for the rears). I suggest contacting Smittybilt for the installation instructions before making your decision so you have an idea of everything that is in store. They e-mailed me the instructions before my purchase which was very helpful in making my decision.
Time- You will need a LOT of time to install these. It took 2 full days for me to put on the fronts (by myself) and 2 full days to put on the rears (with help). I consider my skill level to be bolt-off and bolt-on so I figure someone more skilled with help could move faster, but it is still time consuming.
Help Needed- I was able to to do the fronts by myself and they bolted on with no issues. A helper would have saved time though. For the rears a helper is a must as these are not simply bolt on. You will be doing a lot of fitting, marking and drilling. These corner guards are cumbersome and awkwardly shaped so you will need someone there to help hold as you line up for marking, drilling holes, installing nutserts etc.
Fit (Front)- I was very surprised that the fit for the fronts was for the most part a bolt on type of installation. The biggest time sink comes from having to remove and reinstall several other pieces (cowls, windshield brackets, front grill, side steps, etc) just to get the OEM fenders off. The installation of the inner liner is a different story. This part can be a real PITA. In fact, I actually broke my passenger side inner fender trying to get it to fit. Patience and a dremmel are strongly suggested as getting the new inner liner to bend correctly to the new fender can be quite frustrating. Also, once completed you will no longer have a spot for your side marker lamp.
Fit (Rears)- The installation of the rear corner guards was quite a bit different as they are bolted directly on the the tub using holes you drill. Again make sure you have help and take your time to ensure you have everything lined up when making your marks for drilling. The instructions call for C-clamps to help hold the fender once in place (to help in marking drill holes) but we had trouble finding good places where we could use the C-clamps. We ended having one of us hold the fender as we made our drill marks. Once the holes are drilled you then install "nutcerts" (aka rivet nuts). My suggestion is to try and pick up a rivet nut tool on the cheap if possible. Supposedly Harbor Freight sells one. I had no experience with these before, but basically they work like a rivet, but then you are able to screw a bolt into it. A rudimentary tool is supplied but we ended up breaking both of them due to amount of toque we were putting on them to get the rivet nuts installed. Later we found WD40 made the process much much easier. If you run into trouble you are best to use the term "rivet nut" and not nutcert in your google search...as with the fronts, the inner liner can be a PITA.
Instruction Quality- We found the instructions to be straight forward for the installation process, but did lack some details when it came to initial tear-down. Below are some of the missing pieces:
- You will be pulling off your antenna, but finding out how to disconnect the wire inside took some research. For this you need to take off your glove box and try to find the antenna wire hidden somewhere behind the front speaker. When reattaching, you will be feeding the detached wire back through the external hole into the jeep. This hole is found in this same area behind the speaker and can be a major pain when it comes to trying to find the wire to reattach.
- Taking off the front fender... The instructions simply state to remove your front fender. You will need to determine where all the screws are located yourself and this does take some time and searching. You will also need to remove side steps or rock rails for this install and possibly your rear bumper. It will be up to you to figure this out do to all the variations and designs out there.
- I did find one mistake in the reinstallation of the side cowls. Originally you drill out the spot welds holding the side cowls in with a 1/4" drill bit and are given self tapping screws to reattach the cowl once you are finished, however the self tapping screws are only 3/16" and too small for the holes you drilled. We fixed this by picking up a pack of nuts and bolts instead
Tools needed:
- Both Standard and Metric wrenches and sockets (10mm and 13mm get used a LOT)
- Torx set covering both small and larger sizes
- Allen wrench set
- dremmel with cutting wheel
- handled pry bar (for pulling the plastic inner fender clips)
- Rustoleum truckbed liner (optional for spraying some of the newly exposed areas of the wheel wells when completed)
- mallet (to help with stubborn plastic inner fender clips)
- grease pen or marking tool for marking drill holes
- Electric drill since you are drilling into metal and drill bits (3/8 and 1/2 are used for sure)
Overall impression- I am very pleased with my purchase. The construction quality is impressive as well as the fit. The time needed to install was a little more than I anticipated, but again we're talking about full fender replacement and bolt on corner guards so not totally unreasonable. As someone who is limited in my skillset and resources, I found these to be an excellent way for someone like me to gain a heavy modified look/function without having to seriously modify my jeep. The most annoying part of the install was working the inner fenders and installing the nutserts (rivet nuts). Beyond that our install was pretty much uneventful.
One suggestion I have for the manufacturer is to look into creating some type of easy bolt on flare to help with tire coverage when not on the trail. There's 16 exposed bolts on each corner and it seems like this could be something easy to fab up for those who want the best of both worlds.
Hope this helps!
Last edited by Kahuna Mas; Nov 27, 2010 at 10:25 PM.

JK Enthusiast
Joined: Aug 2009
Posts: 329
Likes: 0
From: Lafayette,La
Very Nice Rig! And great right up! I have been wondering about these fenders. I never thought about how much you would have to cut into the body to fit these. I Figured they were a straight up bolt on application. 
JK Junkie
Joined: Apr 2010
Posts: 2,123
Likes: 1
From: - - Jeep-topia - -
I really like the Rear ones a lot. I am still loving my cut fenders up front, i don't think i can get rid of those just yet. 
But thanks for taking the time to post up some pics and give us a run through of your install. You definitely don't have to worry about any of those tight spots on the trail anymore
But thanks for taking the time to post up some pics and give us a run through of your install. You definitely don't have to worry about any of those tight spots on the trail anymore
Trending Topics
JK Newbie

Joined: May 2009
Posts: 74
Likes: 0
From: San Antonio, Texas
I ordered a set (front & rears) for my two-door back in September through 4-Wheel parts. The fronts came in within ten days. The rears on the other hand are still on back order. I called Smittybilt and they told me there was a design flaw on the two-door rears that needed to be corrected. They said the manufacturer should start sending them out sometime in early January. Their first batch is suppose to include fifty rears. If you want them, better order them now cause you're going to be waiting anyway.