
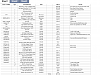
Diy hemi swap info w/spreadsheet


Thread Starter
JK Enthusiast
Joined: Aug 2012
Posts: 266
Likes: 10
From: Myrtle Beach, SC
Some of you know I finished up a Hemi swap on my 2009 JKUR in November. I have since been asked by many for a copy of the spreadsheet I put together. The spreadsheet was put together with the intent of sharing it with those folks interested in the Hemi swap but, like me, may be wondering about all the little aggravating shit that one may have to buy. The nickel and dime factor. Take into consideration I used a complete dropout (engine w/ all accessories, transmission and even the t-case that could be sold) from a 2010 Ram 4x4. By using a transmission (4wd) of this year I did not need to buy the 4wd transmission adapter which saves a few bucks. In addition by using a transmission of this year it was NOT necessary to change out the valve body solenoid. When you are shopping for an engine find the best price with the lowest miles and the most inclusive of parts. Try to get all of the accessories, fuel line, transmission cooling lines, stock harness and comp not necessary but will keep ports closed for storage and debris prevention in harness ports. Again this was done using a truck motor so it may vary from Grand Cherokee/Commander and car engines. Can't imagine it being much different. At the time I did my swap, according to Todd at Jeep Speed Shop, the 2010 transmission was the holy grail. Not sure if getting a newer engine makes any difference. Careful research, shopping and patience are money savers.
The only thing the sheet does not reflect is the $170, in addition to the Flowmaster 50, I had to pay the exhaust guy to do my exhaust. This is country boy prices so it is likely it will be more expensive for some of you. For those of you in my neck of the woods, it is Brads Exhaust in Camden, SC. I don't want to hear any shit from y'all, but I used the stock cats. I went prepared to pay for new ones but the guy, in his 33 years of exp, said he would use the stock ones. So I will until they burn out or whatever. I got a code for catalyst inefficiency once. I tightened the O2 sensors went away and has yet to come back.
I will add more information as I remember. Hope it helps. Feel free to ask questions or make comments. If for some reason you can not print the spreadsheet feel free to PM me with your email.
Last edited by Da20captain; Apr 20, 2016 at 05:39 AM.
Thread Starter
JK Enthusiast
Joined: Aug 2012
Posts: 266
Likes: 10
From: Myrtle Beach, SC
I am compiling this in the effort to help those with what may not be obvious to those of us with limited mechanical experience. This is in no way the GOSPEL of instructions. However, it is likely much of the information will be of some use. I have never done anything like this and I will say that looking back is was not that difficult. I would not pay $20k+ to have someone else do it.
I did quite a bit of research and waited until I had all parts in hand before starting the swap. While not perfect, pay close attention to my sheet as there are some items that you will need that are not listed on the JSS BOM. Such as the Hump coupler hose that goes between air filter adapter and the throttle body. It took about two months to get everything. In the time I was waiting I did research and had a couple guys from the forum lined up to answer questions. Do this! JSS is a small understaffed outfit so be prepared to wait for answers you could get from a forum member. There are a shitpile of videos on YouTube that you can get good info from even if it is not necessarily relative to the subject of the video. While I am thinking, I would highly recommend baggies and sharpie to keep track of parts removed. Also take pictures for future reference. Also this thread is not to be anything but helpful to anyone,especially those like me, with little to no mechanical experience.
This swap can be achieved with a basic set of hand tools, wrenches, ratchets and sockets. A 10mm, 13mm, 15mm and an 18mm will get you pretty far. Specialty tools needed: angle grinder, Dremel, Die Grinder useful, fuel line disconnect tool, a pipe cutter also valuable but not imperative. Large screwdriver or pry bar. And a welder or person that can weld. Engine hoist or a lift. And believe it or not a long weekend.
I took the body off approach, which having done it that way, is the only way. Obviously it can be done body on. Motech has a couple of good videos regarding preparation of body for removal on YouTube. May take a couple hours. The body was removed (8-10 bolts, 18mm)and replaced without opening the brake/ABS system. Simply unbolt the Master Cylinder from booster. This will allow the booster to stay with the body. The ABS module will need to be released from its position in the tray. Some say you can pull it up and in my case there had to be a little pushing and pulling. Access to its mounting pins can be had from the underside in the fender well. For body replacement you will need to remove the tray on which the ABS module and PCM mount. Once body is back on you can slide the tray under everything. When body was removed we just set it on a utility trailer and parked it under a shed. Once the body was removed that is when I removed the radiator and all that shit.

TIP. If you remove body. Use a plumb bob to help realign. The two studs on the front of the body if aligned will pretty much guarantee the rest will jive. Roll cage frame tie ins help a lot if you have them.
PREPARING THE MOTOR.
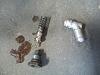
I would recommend holding on to the 3.8 because, in my case and likely yours, there will be a few parts to save. Like maybe an AC line, fuel return line, Fuel Purge Valve (little canister on battery box) power steering pump or the fittings and the rubber transmission mount and the stock JK power Steering Res. JK pump can be used but in my case it appeared the pulley was going to hit Steering box. If it works for you drill out the mounting threads. I used the Hemi pump with smaller pulley and removed the fittings from the JK pump. I had to trash the pulley on JK pump to get fittings. The elbow can be removed by carefully twisting back and forth with and adjustable wrench. The brass fitting is 7/8", I believe.
Fittings needed from JK pump
VIDEO POWER STEERING PUMP
https://m.youtube.com/watch?v=snG3o84l4Cs
The truck motor will require repositioning the throttle body off to the side of its original position. There will be an adapter provided for this. There is a gasket on the original position on the intake manifold and you will then have to attach the throttle body to the AIR INTAKE ADAPTER. I did use RTV when bolting the throttle body to the adapter. The INTAKE ADAPTER will be bolted with provided hardware to the throttle body's original position on the intake manifold. Use care and an X pattern when attaching the intake adapter. The manifold is plastic and can be stripped easily. Also maybe inspect and clean the TB.
EXHAUST MANIFOLDS. East coasters be prepared to replace exhaust manifold studs, especially the doubles. Two broke off for me. Consider PB Blaster a length of time prior to loosening. Broken manifold bolts are common according to my research. I have been told you are better off removing with and impact as opposed to trying to ease them out gently with a ratchet. I was using a ratchet when mine broke. Tighten new manifold bolts to 18ftlbs
EXHAUST: As I said before I am using two stock JK cats with no issues at all. And I will until they don't perform any longer. As far as O2 sensors go, you can definitely use the stock downstream/rear sensor. I know of someone using all stock JK sensors with no issues. I ordered 2 new O2 sensors as listed on the spreadsheet. I do not live in a state with emissions testing. I don't know what it takes to pass the emissions testing. My scanner says it will.
The CAPACITOR mounts on the aft end of the drivers side head and is attached using the ground bolt. It will be obvious where it goes. And don't forget to tighten the grounds on the rear of the heads. No idea what this capacitor does. I have heard of running without.
WIRING HARNESS. The wiring harness is easy. I would recommend starting on the forward front side and go back and around. Or you can find a component or two that you are certain what it is and start there. The rest will kind of let you know where it goes. Length dictates.
NOTE: Apparently there are two different types of connector/harness patterns for the Intake Air Temp Sensor. So you may want to figure out which you have so they can make it to use your JK sensor or you can just get another for $15 off eBay. If not they just kind of guess which you have.

NOTE: Also there are a couple different types of THROTTLE BODIES. First type is 2012 and below with an 85mm bore it appears, with a part code of 53032801AC, 6 pin (3 pin wide)harness. The second, 2013 and newer, with a part number of 53034251AB which I believe is an 87mm bore Throttle body. It has single row harness 6 pins wide.
 I
I
It will be necessary to repin the C3 harness (3rd harness in on PCM from driver side) that will remain attached to body. HOTWIRE AUTO has a great set of instructions for this procedure.
PCM/COMPUTER: Simply replace the old PCM with the new one and be sure to reattach the ground. Plug in all 4 harnesses and it works. I have heard of programming mistakes that are easily fixed but just take time. But these complaints have been very few. So don't be concerned. I have heard of incorrect VIN#'s being entered and causing issues.
FAN and CLUTCH If you use the 18" fan it will hit some accessories. So once the fan and clutch are installed just bend the blades back a 1/4". Also on the intake manifold there is a point made of plastic that sticks out towards the front about an 1.5". Cut it off. Rember when removing the old fan clutch that if is a reverse thread component.
BATTERY/STARTER CABLES. You will at least need to extend the ground or you could make some about 12-18" longer.
That's all I can think of on the engine.
OIL FILTER ADAPTER. After removing the old oil filter stud by welding a nut or I swear it could be removed with a gigantic 12MM Allen wrench. Heat may be needed to soften the Loctite on the stud. When installing the new adapter make sure the new gasket it not twisted or offset or it will leak. And just bolt on. It may seem like it will be in the way looking ahead but it all will fit. TERAFLEX GUYS WITH FRAME BRACE. Have a bend put in it to clear the adapter or just leave brace bar off. I spoke to Dennis at Teraflex about this.
You may end up with two oil sensors. I left both and use one. Taped off the one not in use or you can go and get a brass plug.
NOTE: I have heard of an instance where a guy upgraded to a front Dana 60 and there were potential clearance issues. I believe he ended up doing a remote oil filter setup. I do not know how much lift he had.
BATTERY TRAY. Fairly straight forward. One wire bundle will kind of be around the top and one will be under the tray. Rubicon guys, the locker relays that are in the back passenger corner of battery tray will likely need to be repositioned to the top of the fender just a few inches forward from its original position.
My battery ended up being in the rearward position due to short cables with negative side toward pass fender. Make sure you trim the studs at the firewall.
VIDEO: BATTERY TRAY INSTALL
https://m.youtube.com/watch?v=zAFPylHSmKU
NOTE. When installing the TIPM to the new mount and have to remove any of the harnesses. Make sure you use care releasing the locks as they may be brittle. And also label which ones are which. I stared at some pics quite a while getting them in order.
Also the TIPM mount will bolt to the battery box/tray, as does the AIR FILTER ADAPTER
AIR FILTER ADAPTER. I would recommend bolting the the air filter adapter prior to the TIPM for accessibility issues. I personally ltightened it to where I could still, with a bit of force, adjust te position a bit. The air filter is a fairly tight fit. Be sure to install the HUMP HOSE and T-CLAMPS in between the Throttle Body and Air Filter Adapter.
COOLANT BOTTLE That can be a tight fit but will slide in the slots on the air filter adapter. One guy I know used a heat gun to reshape his bottle a little. The C300 harness is in the vicinity of the base of the bottle so take that into consideration when trying to force the bottle to mount.
TRANNY/POWER STEERING COOLER. I am using a B&M tranny cooler and used the stock JK tranny cooler that is located on the lower portion of the AC condenser as a power steering cooler. Just double clamped the rubber hose to metal tube connections from the stock tranny cooler line connections that attach to the stock tranny cooler within the stock radiator. Holds up fine.
NOTE: When using ratcheting clamps make sure you position them considering access in the future. Or you can obviously do the flaring method.
The stock 545RFE transmission lines can be used so do not throw them away.
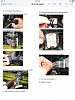
MOTOR MOUNTS AND MOUNTING. Once the old mounts are removed from frame the new ones are no brainer to line up and weld. There are a couple factory oval holes in the frame that the new motor mounts must align with. The passenger side oval hole will be obstructed by the factory frame mount but it IS there. For the Hemi the mount should be in the forward position and for the truck motor use the bottom mounting holes. You can use stock JK bolts for mounts. I bought new. On the rubber engine (Grand Cherokee) mounts it was said to install with labels up. In my case this was incorrect. It put the tail of trans about 20 degrees off. So I flipped the passenger side over. All good. I know of one other guy that this tip saved him some aggravation. For those doing body on the rubber mounts will have to be put on once the engine is position and slide them up from the bottom.
VIDEO RUBBER MOTOR MOUNTS
https://m.youtube.com/watch?v=0fXRsrZiBBE
VIDEO: WELD IN MOTOR MOUNTS
https://m.youtube.com/watch?v=h-KleobqddM
TRANSMISSION/XFER CASE MOUNTING: Before mounting the flat adapter plate be sure to tighten all the XFER case mounting nuts or you will have to take the adapter off to tighten them. Ask me how I know. The plate with the bend is used as a support and will install on the bottom side of the crossmember. The point where the flat adapter and the adapter with bend intersect, tack weld. In order for the XFER case shift bracket to line up you will have to notch a rib on the transmission. It will be obvious. In the end all of my shift cables lacked the need of any adjustment. I just popped them all back on as is. It would also be a good idea to extend the breather ones on the new tranny and XFER case.
VIDEO: Transmission adapters
https://m.youtube.com/watch?v=J-Xniw1qzak
For the body on guys, the XFER CASE will have to be installed separately, from what I hear.
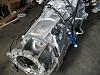
FUEL LINE ADAPTER. Just tighten it up and it will be apparent how and where it goes on the forward portion of the fuel tank to engine fuel line. There should be plenty of slack. When disconnecting fuel,lines you will need to have a set of fuel line disconnect tools. Like $10
The FUEL LINE ADAPTER is in Blue. But also in this pic you can see the 4ed adapter on the rear of the transmission
AC/AC LINES. Pretty much self explanatory. I know of one guy who has not gotten his squared away yet but he uses a Grand Cherokee motor. Not sure what the deal is with that. Again I used a TRUCK motor. Be aware that you will need to have a shop recover the freon. There are other ways to do this but the EPA might hate you. The system with need to be vacuumed and recharged. The AC compressor will need a bit of material removed for clearance of steering box. A grinder and a drill makes short work. Grinder for clearance and drill to recess the head of the new provided hex head mounting bolt. If I remember correctly a 9/16" bit does the trick. Do not drill to deep or it will cost you. No deeper than the thickness of the bolt head.
VIDEO: AC compressor clearance modification
https://m.youtube.com/watch?v=D3G6Hrw9MBQ
POWER STEERING LINES. If I remember correctly the pressure line I kind of wrapped around the steering box. They are kind of a bitch.
There will be a supplied bracket in the kit to relocate the fluid reservoir(Stock JK). Mine bracket was for a different motor but it was cut and modified. The stock return one that goes across the front crossmember will not be reused.
NOTE:If you think down the line you will want to do hydro assist, now is the time. It will be a hassle if you wait because everything looks to be in the way of removing your steering box. You may consider buying a little pipe cutter from Lowes, I think maybe $10.
STEERING ADAPTER PLATE.
The steering shaft will need to be moved over approx 1/2" so it will not make contact with the head. Just use a die grinder or something to make the hole bigger. The adapter plate will work on either side of firewall. The 2007-2010 the pillow bearing is on the inside of the firewall so that is where you will need to mount th adapter plate. On the 2011 and up the pillow bearing is on the outside of the firewall, therefor the adapter plate will go on the outside. If you mount on the outside you will also need to trim the studs. Make sure you strap the steering wheel to prevent movement.
VIDEO: Steering Column Mod/Adapter Plate
https://m.youtube.com/watch?v=ziywJTLkqcQ
This is about all I can think of at this point. I will add as I recall. In the end you might have 3/4" of space between fan clutch and radiator, 3/4" of space between firewall and the heads. So if it looks like it is gonna be tight during the process, it's because it will.
FIRST START: turn the key to the on position, not start, and let the fuel pump prime the lines. Repeat this step 5 or 6 times. Once you have finished praying hoping, turn the key. It should fire right up. My first start was just that. No lights no nothing, just what I wanted. My engine sat for at least a year before I got it.
TRIPLE CHECK ALL GROUNDS PRIOR TO STARTING.
I did quite a bit of research and waited until I had all parts in hand before starting the swap. While not perfect, pay close attention to my sheet as there are some items that you will need that are not listed on the JSS BOM. Such as the Hump coupler hose that goes between air filter adapter and the throttle body. It took about two months to get everything. In the time I was waiting I did research and had a couple guys from the forum lined up to answer questions. Do this! JSS is a small understaffed outfit so be prepared to wait for answers you could get from a forum member. There are a shitpile of videos on YouTube that you can get good info from even if it is not necessarily relative to the subject of the video. While I am thinking, I would highly recommend baggies and sharpie to keep track of parts removed. Also take pictures for future reference. Also this thread is not to be anything but helpful to anyone,especially those like me, with little to no mechanical experience.
This swap can be achieved with a basic set of hand tools, wrenches, ratchets and sockets. A 10mm, 13mm, 15mm and an 18mm will get you pretty far. Specialty tools needed: angle grinder, Dremel, Die Grinder useful, fuel line disconnect tool, a pipe cutter also valuable but not imperative. Large screwdriver or pry bar. And a welder or person that can weld. Engine hoist or a lift. And believe it or not a long weekend.
I took the body off approach, which having done it that way, is the only way. Obviously it can be done body on. Motech has a couple of good videos regarding preparation of body for removal on YouTube. May take a couple hours. The body was removed (8-10 bolts, 18mm)and replaced without opening the brake/ABS system. Simply unbolt the Master Cylinder from booster. This will allow the booster to stay with the body. The ABS module will need to be released from its position in the tray. Some say you can pull it up and in my case there had to be a little pushing and pulling. Access to its mounting pins can be had from the underside in the fender well. For body replacement you will need to remove the tray on which the ABS module and PCM mount. Once body is back on you can slide the tray under everything. When body was removed we just set it on a utility trailer and parked it under a shed. Once the body was removed that is when I removed the radiator and all that shit.
TIP. If you remove body. Use a plumb bob to help realign. The two studs on the front of the body if aligned will pretty much guarantee the rest will jive. Roll cage frame tie ins help a lot if you have them.
PREPARING THE MOTOR.
I would recommend holding on to the 3.8 because, in my case and likely yours, there will be a few parts to save. Like maybe an AC line, fuel return line, Fuel Purge Valve (little canister on battery box) power steering pump or the fittings and the rubber transmission mount and the stock JK power Steering Res. JK pump can be used but in my case it appeared the pulley was going to hit Steering box. If it works for you drill out the mounting threads. I used the Hemi pump with smaller pulley and removed the fittings from the JK pump. I had to trash the pulley on JK pump to get fittings. The elbow can be removed by carefully twisting back and forth with and adjustable wrench. The brass fitting is 7/8", I believe.
Fittings needed from JK pump
VIDEO POWER STEERING PUMP
https://m.youtube.com/watch?v=snG3o84l4Cs
The truck motor will require repositioning the throttle body off to the side of its original position. There will be an adapter provided for this. There is a gasket on the original position on the intake manifold and you will then have to attach the throttle body to the AIR INTAKE ADAPTER. I did use RTV when bolting the throttle body to the adapter. The INTAKE ADAPTER will be bolted with provided hardware to the throttle body's original position on the intake manifold. Use care and an X pattern when attaching the intake adapter. The manifold is plastic and can be stripped easily. Also maybe inspect and clean the TB.
EXHAUST MANIFOLDS. East coasters be prepared to replace exhaust manifold studs, especially the doubles. Two broke off for me. Consider PB Blaster a length of time prior to loosening. Broken manifold bolts are common according to my research. I have been told you are better off removing with and impact as opposed to trying to ease them out gently with a ratchet. I was using a ratchet when mine broke. Tighten new manifold bolts to 18ftlbs
EXHAUST: As I said before I am using two stock JK cats with no issues at all. And I will until they don't perform any longer. As far as O2 sensors go, you can definitely use the stock downstream/rear sensor. I know of someone using all stock JK sensors with no issues. I ordered 2 new O2 sensors as listed on the spreadsheet. I do not live in a state with emissions testing. I don't know what it takes to pass the emissions testing. My scanner says it will.
The CAPACITOR mounts on the aft end of the drivers side head and is attached using the ground bolt. It will be obvious where it goes. And don't forget to tighten the grounds on the rear of the heads. No idea what this capacitor does. I have heard of running without.
WIRING HARNESS. The wiring harness is easy. I would recommend starting on the forward front side and go back and around. Or you can find a component or two that you are certain what it is and start there. The rest will kind of let you know where it goes. Length dictates.
NOTE: Apparently there are two different types of connector/harness patterns for the Intake Air Temp Sensor. So you may want to figure out which you have so they can make it to use your JK sensor or you can just get another for $15 off eBay. If not they just kind of guess which you have.
NOTE: Also there are a couple different types of THROTTLE BODIES. First type is 2012 and below with an 85mm bore it appears, with a part code of 53032801AC, 6 pin (3 pin wide)harness. The second, 2013 and newer, with a part number of 53034251AB which I believe is an 87mm bore Throttle body. It has single row harness 6 pins wide.
It will be necessary to repin the C3 harness (3rd harness in on PCM from driver side) that will remain attached to body. HOTWIRE AUTO has a great set of instructions for this procedure.
PCM/COMPUTER: Simply replace the old PCM with the new one and be sure to reattach the ground. Plug in all 4 harnesses and it works. I have heard of programming mistakes that are easily fixed but just take time. But these complaints have been very few. So don't be concerned. I have heard of incorrect VIN#'s being entered and causing issues.
FAN and CLUTCH If you use the 18" fan it will hit some accessories. So once the fan and clutch are installed just bend the blades back a 1/4". Also on the intake manifold there is a point made of plastic that sticks out towards the front about an 1.5". Cut it off. Rember when removing the old fan clutch that if is a reverse thread component.
BATTERY/STARTER CABLES. You will at least need to extend the ground or you could make some about 12-18" longer.
That's all I can think of on the engine.
OIL FILTER ADAPTER. After removing the old oil filter stud by welding a nut or I swear it could be removed with a gigantic 12MM Allen wrench. Heat may be needed to soften the Loctite on the stud. When installing the new adapter make sure the new gasket it not twisted or offset or it will leak. And just bolt on. It may seem like it will be in the way looking ahead but it all will fit. TERAFLEX GUYS WITH FRAME BRACE. Have a bend put in it to clear the adapter or just leave brace bar off. I spoke to Dennis at Teraflex about this.
You may end up with two oil sensors. I left both and use one. Taped off the one not in use or you can go and get a brass plug.
NOTE: I have heard of an instance where a guy upgraded to a front Dana 60 and there were potential clearance issues. I believe he ended up doing a remote oil filter setup. I do not know how much lift he had.
BATTERY TRAY. Fairly straight forward. One wire bundle will kind of be around the top and one will be under the tray. Rubicon guys, the locker relays that are in the back passenger corner of battery tray will likely need to be repositioned to the top of the fender just a few inches forward from its original position.
My battery ended up being in the rearward position due to short cables with negative side toward pass fender. Make sure you trim the studs at the firewall.
VIDEO: BATTERY TRAY INSTALL
https://m.youtube.com/watch?v=zAFPylHSmKU
NOTE. When installing the TIPM to the new mount and have to remove any of the harnesses. Make sure you use care releasing the locks as they may be brittle. And also label which ones are which. I stared at some pics quite a while getting them in order.
Also the TIPM mount will bolt to the battery box/tray, as does the AIR FILTER ADAPTER
AIR FILTER ADAPTER. I would recommend bolting the the air filter adapter prior to the TIPM for accessibility issues. I personally ltightened it to where I could still, with a bit of force, adjust te position a bit. The air filter is a fairly tight fit. Be sure to install the HUMP HOSE and T-CLAMPS in between the Throttle Body and Air Filter Adapter.
COOLANT BOTTLE That can be a tight fit but will slide in the slots on the air filter adapter. One guy I know used a heat gun to reshape his bottle a little. The C300 harness is in the vicinity of the base of the bottle so take that into consideration when trying to force the bottle to mount.
TRANNY/POWER STEERING COOLER. I am using a B&M tranny cooler and used the stock JK tranny cooler that is located on the lower portion of the AC condenser as a power steering cooler. Just double clamped the rubber hose to metal tube connections from the stock tranny cooler line connections that attach to the stock tranny cooler within the stock radiator. Holds up fine.
NOTE: When using ratcheting clamps make sure you position them considering access in the future. Or you can obviously do the flaring method.
The stock 545RFE transmission lines can be used so do not throw them away.
MOTOR MOUNTS AND MOUNTING. Once the old mounts are removed from frame the new ones are no brainer to line up and weld. There are a couple factory oval holes in the frame that the new motor mounts must align with. The passenger side oval hole will be obstructed by the factory frame mount but it IS there. For the Hemi the mount should be in the forward position and for the truck motor use the bottom mounting holes. You can use stock JK bolts for mounts. I bought new. On the rubber engine (Grand Cherokee) mounts it was said to install with labels up. In my case this was incorrect. It put the tail of trans about 20 degrees off. So I flipped the passenger side over. All good. I know of one other guy that this tip saved him some aggravation. For those doing body on the rubber mounts will have to be put on once the engine is position and slide them up from the bottom.
VIDEO RUBBER MOTOR MOUNTS
https://m.youtube.com/watch?v=0fXRsrZiBBE
VIDEO: WELD IN MOTOR MOUNTS
https://m.youtube.com/watch?v=h-KleobqddM
TRANSMISSION/XFER CASE MOUNTING: Before mounting the flat adapter plate be sure to tighten all the XFER case mounting nuts or you will have to take the adapter off to tighten them. Ask me how I know. The plate with the bend is used as a support and will install on the bottom side of the crossmember. The point where the flat adapter and the adapter with bend intersect, tack weld. In order for the XFER case shift bracket to line up you will have to notch a rib on the transmission. It will be obvious. In the end all of my shift cables lacked the need of any adjustment. I just popped them all back on as is. It would also be a good idea to extend the breather ones on the new tranny and XFER case.
VIDEO: Transmission adapters
https://m.youtube.com/watch?v=J-Xniw1qzak
For the body on guys, the XFER CASE will have to be installed separately, from what I hear.
FUEL LINE ADAPTER. Just tighten it up and it will be apparent how and where it goes on the forward portion of the fuel tank to engine fuel line. There should be plenty of slack. When disconnecting fuel,lines you will need to have a set of fuel line disconnect tools. Like $10
The FUEL LINE ADAPTER is in Blue. But also in this pic you can see the 4ed adapter on the rear of the transmission
AC/AC LINES. Pretty much self explanatory. I know of one guy who has not gotten his squared away yet but he uses a Grand Cherokee motor. Not sure what the deal is with that. Again I used a TRUCK motor. Be aware that you will need to have a shop recover the freon. There are other ways to do this but the EPA might hate you. The system with need to be vacuumed and recharged. The AC compressor will need a bit of material removed for clearance of steering box. A grinder and a drill makes short work. Grinder for clearance and drill to recess the head of the new provided hex head mounting bolt. If I remember correctly a 9/16" bit does the trick. Do not drill to deep or it will cost you. No deeper than the thickness of the bolt head.
VIDEO: AC compressor clearance modification
https://m.youtube.com/watch?v=D3G6Hrw9MBQ
POWER STEERING LINES. If I remember correctly the pressure line I kind of wrapped around the steering box. They are kind of a bitch.
There will be a supplied bracket in the kit to relocate the fluid reservoir(Stock JK). Mine bracket was for a different motor but it was cut and modified. The stock return one that goes across the front crossmember will not be reused.
NOTE:If you think down the line you will want to do hydro assist, now is the time. It will be a hassle if you wait because everything looks to be in the way of removing your steering box. You may consider buying a little pipe cutter from Lowes, I think maybe $10.
STEERING ADAPTER PLATE.
The steering shaft will need to be moved over approx 1/2" so it will not make contact with the head. Just use a die grinder or something to make the hole bigger. The adapter plate will work on either side of firewall. The 2007-2010 the pillow bearing is on the inside of the firewall so that is where you will need to mount th adapter plate. On the 2011 and up the pillow bearing is on the outside of the firewall, therefor the adapter plate will go on the outside. If you mount on the outside you will also need to trim the studs. Make sure you strap the steering wheel to prevent movement.
VIDEO: Steering Column Mod/Adapter Plate
https://m.youtube.com/watch?v=ziywJTLkqcQ
This is about all I can think of at this point. I will add as I recall. In the end you might have 3/4" of space between fan clutch and radiator, 3/4" of space between firewall and the heads. So if it looks like it is gonna be tight during the process, it's because it will.
FIRST START: turn the key to the on position, not start, and let the fuel pump prime the lines. Repeat this step 5 or 6 times. Once you have finished praying hoping, turn the key. It should fire right up. My first start was just that. No lights no nothing, just what I wanted. My engine sat for at least a year before I got it.
TRIPLE CHECK ALL GROUNDS PRIOR TO STARTING.
Last edited by Da20captain; Apr 25, 2016 at 08:30 AM.
Thread Starter
JK Enthusiast
Joined: Aug 2012
Posts: 266
Likes: 10
From: Myrtle Beach, SC
INSTALLATION REFERENCE
The link below is great reference but not a set of instructions for the JSS kit specifically. It will come in handy.
http://www.aev-conversions.com/ishee...tion_Guide.pdf
Jeep Speed Shop: Todd Custer. Great resource, when you can reach him. 707.338.3154. Phone accepts text messages. Jeepspeedshop.com has some good videos. BOM's and limited instructions. Not trying to knock the guy but he built and figured these kits would be sold to experienced mechanics who would just kind know what to do. In the end everything Todd told me was spot on.
HOTWIRE AUTO:
Harness maker for JSS kits and for others as well. Speak to Chris with harness questions. Great guy and very helpful. 479.243.9115 or hotwireauto.com
VIDEOS. Mainly used for body removal reference and other views
https://m.youtube.com/watch?v=2HPT7KiveXM
https://m.youtube.com/watch?v=2KAAISk9Gq4
JK VVT 5.7L Truck Hemi Kit #1 | JEEP SPEED SHOP | MelissaKenney.com
Some good vids to the left of the page
BUILD THREADS. All offer some good info
Another CA VVT Hemi - JKowners.com : Jeep Wrangler JK Forum
My 2009-2011 Truck Hemi Install w/Jeep Speed Shop kit! - JKowners.com : Jeep Wrangler JK Forum
5.7 Hemi swap - JKowners.com : Jeep Wrangler JK Forum
VVT 5.7L Truck Hemi on the Cheap Jeep Speed Shop - JKowners.com : Jeep Wrangler JK Forum
https://www.jk-forum.com/forums/modi...i-swap-334638/
ENGINE AND TRANSMISSION SOURCES
Craigslist.com . Found mine on there
Car-part.com
Greenleafprime on eBay. Not the cheapest but typically have some low mileage stuff
Moparparsdeals.com: majority of my MOPAR parts came from here.
Steve White motors in Boone, NC. I know a guy that got a bitchin deal on a crate 6.4. Like a couple -$3k cheaper than his local Florida dealer. The guy to speak with is Luke
Co-part.com: entire vehicles can be purchased for cheap in some cases. If you have the room or the cold neighbors you can do this and sell the not needed part and offset much of the cost of the swap.
Amazon.com for few things like the Flowmaster
eBay.com I got a couple things from there
Last edited by Da20captain; Apr 29, 2017 at 09:16 AM. Reason: Added build thread
Thread Starter
JK Enthusiast
Joined: Aug 2012
Posts: 266
Likes: 10
From: Myrtle Beach, SC
So far it's been a year and a half since the swap. No issues with the engine or transmission. I am very happy and still grin when I start it. I did have to replace the radiator last month. Which brings up another point.
One way to save a few hundred bucks on a Hemi swap is to buy the radiator separately from the swap kit. I paid about $700 for the radiator that came with the kit. But you can get, from Summit Racing, a radiator for a little less than $400 shipped. part# SUM380467.
One way to save a few hundred bucks on a Hemi swap is to buy the radiator separately from the swap kit. I paid about $700 for the radiator that came with the kit. But you can get, from Summit Racing, a radiator for a little less than $400 shipped. part# SUM380467.
Trending Topics
JK Jedi
Joined: Apr 2010
Posts: 4,468
Likes: 221
From: SE Michigan
Thanks for posting all this great info. I'm currently starting the planning stages of an LS engine swap. I'm certain many parts and steps will be very similar. Very useful!!
You wouldn't happen to be able to post a link to your original excel file would you? I'll be creating a similar parts list for the LS swap and starting with your HEMI swap original file would be awesome.
You wouldn't happen to be able to post a link to your original excel file would you? I'll be creating a similar parts list for the LS swap and starting with your HEMI swap original file would be awesome.
Last edited by Rednroll; Apr 30, 2017 at 04:53 AM.