Low-cost / Free mods that should be done?


 07-06-2013, 01:18 PM
#3424
JK Newbie
Join Date: Dec 2010
Location: New Tripoli, PA
Posts: 40
Likes: 0
Received 0 Likes
on
0 Posts
So I thought I would give the windjammer a try but didn't want anything commercially available.
This is what the end result looks like. I used high vis parachute cord for the example but will likely use OD in its place.
I started with a decommissioned camo repair kit. This cN be substituted with any durable, non-stretch fabric. That's right. my example came out of the dumpster folks from a military facility...
Then I cut it to fit behind the front seats. I started with a 55"X32" piece. Kept it a little long so I could get it square. Once I had the rough cut I needed to make the lines work to get the piece square with the existing threads. This is done by measuring 3" vertical, 4" horizontal, and 5" diagonal as shown here:
In this case I used 12", 16" and 20".
Then I had my wife stitch a seam with the material folded over itself. Folded the edges twice for reinforcement to have a 1.25" seam
Next I placed the grommets. Now the kit is available at HFT for like $4 so go get one. Handy to have around regardless. Since the mesh and fabric are a poly product punching holes was not practical. I used a torch and heated the punch.
Then I simply melted the holes with the hot punch.
Once the grommets were in the rest was just lacing the parachute cord. Those angled corners at the top are folded at 6" from the corners on a right angle. I may use wire ties rather than the cord but need to try it for a while.
Be sure to get your grommets equally spaced and you will be a happy camper.
Total cost: $4 for the grommet kit.
07-07-2013, 05:24 PM
#3425
JK Newbie

Join Date: Oct 2012
Location: FL
Posts: 43
Likes: 0
Received 0 Likes
on
0 Posts
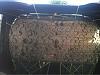
So I thought I would give the windjammer a try but didn't want anything commercially available.
<img src="https://www.jk-forum.com/forums/attachment.php?attachmentid=475384"/>
This is what the end result looks like. I used high vis parachute cord for the example but will likely use OD in its place.
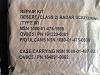
I started with a decommissioned camo repair kit. This cN be substituted with any durable, non-stretch fabric. That's right. my example came out of the dumpster folks from a military facility...
<img src="https://www.jk-forum.com/forums/attachment.php?attachmentid=475385"/>
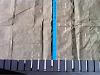
Then I cut it to fit behind the front seats. I started with a 55"X32" piece. Kept it a little long so I could get it square. Once I had the rough cut I needed to make the lines work to get the piece square with the existing threads. This is done by measuring 3" vertical, 4" horizontal, and 5" diagonal as shown here:
<img src="https://www.jk-forum.com/forums/attachment.php?attachmentid=475386"/>
<img src="https://www.jk-forum.com/forums/attachment.php?attachmentid=475387"/>
<img src="https://www.jk-forum.com/forums/attachment.php?attachmentid=475388"/>
In this case I used 12", 16" and 20".
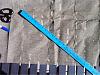
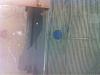
Then I had my wife stitch a seam with the material folded over itself. Folded the edges twice for reinforcement to have a 1.25" seam
<img src="https://www.jk-forum.com/forums/attachment.php?attachmentid=475389"/>
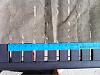
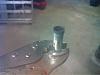
Next I placed the grommets. Now the kit is available at HFT for like $4 so go get one. Handy to have around regardless. Since the mesh and fabric are a poly product punching holes was not practical. I used a torch and heated the punch.
<img src="https://www.jk-forum.com/forums/attachment.php?attachmentid=475394"/>
<img src="https://www.jk-forum.com/forums/attachment.php?attachmentid=475395"/>
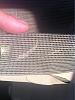
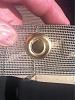
Then I simply melted the holes with the hot punch.
<img src="https://www.jk-forum.com/forums/attachment.php?attachmentid=475396"/>
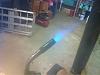
Once the grommets were in the rest was just lacing the parachute cord. Those angled corners at the top are folded at 6" from the corners on a right angle. I may use wire ties rather than the cord but need to try it for a while.
<img src="https://www.jk-forum.com/forums/attachment.php?attachmentid=475397"/>
Be sure to get your grommets equally spaced and you will be a happy camper.
Total cost: $4 for the grommet kit.
<img src="https://www.jk-forum.com/forums/attachment.php?attachmentid=475384"/>
This is what the end result looks like. I used high vis parachute cord for the example but will likely use OD in its place.
I started with a decommissioned camo repair kit. This cN be substituted with any durable, non-stretch fabric. That's right. my example came out of the dumpster folks from a military facility...
<img src="https://www.jk-forum.com/forums/attachment.php?attachmentid=475385"/>
Then I cut it to fit behind the front seats. I started with a 55"X32" piece. Kept it a little long so I could get it square. Once I had the rough cut I needed to make the lines work to get the piece square with the existing threads. This is done by measuring 3" vertical, 4" horizontal, and 5" diagonal as shown here:
<img src="https://www.jk-forum.com/forums/attachment.php?attachmentid=475386"/>
<img src="https://www.jk-forum.com/forums/attachment.php?attachmentid=475387"/>
<img src="https://www.jk-forum.com/forums/attachment.php?attachmentid=475388"/>
In this case I used 12", 16" and 20".
Then I had my wife stitch a seam with the material folded over itself. Folded the edges twice for reinforcement to have a 1.25" seam
<img src="https://www.jk-forum.com/forums/attachment.php?attachmentid=475389"/>
Next I placed the grommets. Now the kit is available at HFT for like $4 so go get one. Handy to have around regardless. Since the mesh and fabric are a poly product punching holes was not practical. I used a torch and heated the punch.
<img src="https://www.jk-forum.com/forums/attachment.php?attachmentid=475394"/>
<img src="https://www.jk-forum.com/forums/attachment.php?attachmentid=475395"/>
Then I simply melted the holes with the hot punch.
<img src="https://www.jk-forum.com/forums/attachment.php?attachmentid=475396"/>
Once the grommets were in the rest was just lacing the parachute cord. Those angled corners at the top are folded at 6" from the corners on a right angle. I may use wire ties rather than the cord but need to try it for a while.
<img src="https://www.jk-forum.com/forums/attachment.php?attachmentid=475397"/>
Be sure to get your grommets equally spaced and you will be a happy camper.
Total cost: $4 for the grommet kit.