
OTRATTW Switches

JK Newbie
Joined: Dec 2012
Posts: 95
Likes: 0
From: United States
When ordering these switches, do you have to specify if the switch is going to be mounted horizontally or vertically? i want these switches but if i put them on my daystar panel, the text and markings will be sideways.
Thanks!
Thanks!

JK Enthusiast
Joined: Feb 2011
Posts: 111
Likes: 0
From: Brandon, Vermont
Hey Phunkeydude, which switch did you use for those color combos?
So I got my switch pod and rockers and did a little write up on my steps. Maybe this will help some others. I love my custom switches!
Installing Contura V Laser Etched Rockers In A Rugged Ridge A-Pillar Switch Pod.
Step 1 - Cut openings for switches in switch pod. Use tool of your choice. Score cut lines with an utility knife or if you have a steady hand, a dremel with a small cutting disk makes easy work of it.
Step 2 - Decide the order of your switches from top to bottom. Slide switches partially into openings.
Step 3 - You will observe that the rockers on the switches are thicker in the center so they push on each other not allowing them to properly mount in the openings on switch pod.
Step 4 - Remove the rockers from the switch bases using the special rocker tool.
Step 5 - Push switch bases into switch pod until they click and lock into place. They should be flush and evenly lined up.
Step 6 - Sand the edges of the rockers down. Focus on the center of the edge of the rocker as this is the area that causes them not to flush mount on top of each other. Starting with your bottom rocker, work your way up one by one. Note that the bottom rocker will only be sanded on its top edge, the two middle rockers with have both edged sanded and the top rocker will only have its bottom edge sanded.
Step 7 - Once you have sanded all edges of the rockers, test fitting as you go along, use a black sharpie marker to color in the white sanded edges.
Step 8 - Pop all your rockers onto switch bases until they click into place. Now your ready to install the switch pod in your Jeep following the Rugged Ridge instructions.
JK Enthusiast
Joined: Feb 2011
Posts: 111
Likes: 0
From: Brandon, Vermont
Ok, so I am trying to get the OTRATTW switches wired. I have them put in the Rugged Ridge A Pillar. My wiring layout looks almost like the one pictured earlier. My question is 8 goes to ground and same with 7. 2 and 3 I have figured out. Can I jump all of the 6 posts together like 7 and 8? Also 6 is where you tape into the dash light circuit? I attached a pic of my thinking. I suck at wiring and hope this works. Let me know what you all think. Thanks for the help. 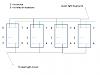
JK Freak
Joined: Jan 2008
Posts: 508
Likes: 5
From: St. Louis, MO
Denver: yes you can jump any of the spades together for ground, dimming, etc. I need to walk out to my garage to look at your number sequence ( I'm literally at the same stage you are, switches in pod, ready to wire), but in general, jumping a bunch of those is no problem and will save you a ton of time and wiring.
JK Enthusiast
Joined: Feb 2011
Posts: 111
Likes: 0
From: Brandon, Vermont
That's good news. Thanks guys. I am worried that I am going to screw it up. Bobholthaus, do you by chance have a pic of your wiring so I might be able to match up to make sure that I am doing it right?
Last edited by denverrubi; Jan 27, 2013 at 04:50 PM.
JK Freak
Joined: Jan 2008
Posts: 508
Likes: 5
From: St. Louis, MO
I'm using three way (on-off-on), dual lighted switches. Based upon the below diagram from OTRATTW, the dual lighted switches are wired independently of the switch operation. That means to make one of the lights illuminate when you move the switch either way, the positive for the light to be illuminated when switched needs to splice into outgoing wire of the activated circuit. So on mine, I want all of the lower lights on all of the time (on mine that will be the wording on my switches, so I can quickly see what the switch is/does). I will jump all of my 10s to the dimmer circuit, and all 9s to ground to accomplish that (and all of my 7s, since theyre just ground wires). Then, on mine, since they're three way, I'm wiring 1 and 3 as incoming, and 2 as outgoing (which is what you do when powering one circuit two different ways. If you wanted to power two circuits with one switch, like two different sets of lights, 2 would be 12v incoming, and 1 and 3 would go to the two different sets of lights.) I will jump 8 to 2 so that whenever the switch is either direction, the logo light will illuminate when the circuit is active (letting me know the lights are actually on). A perfect example of my "backwards" wiring is my reverse lights. When my switch is pushed one way, the lights will come on when I put the jeep in reverse; in this case 1 will be wired to the reverse circuit. When I flip the switch the other way, my reverse lights will be constantly on (for example, when loading the back end with the jeep not running). Therefore, 3 will be wired to my constant fuse box. 2 is the actual wire out to my relay to turn the lights on. 8 is jumped to 2 so in either example, the logo light at the top of the switch will illuminate (both when the lights are constantly switched on, or when the switch is the other direction and I put the jeep in reverse). In my middle indent on the switch, the reverse lights are off, as is the little logo light showing me they're off. So in my case, I'm reversing the incoming and outgoing because I'm lighting the reverse lights, just two different ways.
Denver, give me a call of snap a pic of your OTRATTW wiring page and I'll confirm you're doing it right; your particular situation depends on what youre trying to accomplish and which switches youre using and how the pins are wired. Showing your actual OTRATTW page is most helpful. 314-680-2624
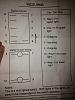
Denver, give me a call of snap a pic of your OTRATTW wiring page and I'll confirm you're doing it right; your particular situation depends on what youre trying to accomplish and which switches youre using and how the pins are wired. Showing your actual OTRATTW page is most helpful. 314-680-2624
Last edited by bobholthaus; Jan 27, 2013 at 05:15 PM.