
U-Pol Raptor Bed Liner in tub - Shots - Notes - Reference Threads

Thread Starter
JK Enthusiast
Joined: Oct 2011
Posts: 419
Likes: 2
From: Indy
I went though and added some descriptions to some of my earlier photos.
It's a good amount of work but I did this 100% by myself so it can be done.
That's cool. Good luck with the project.
That's cool. Good luck with the project.
JK Enthusiast
Joined: Dec 2007
Posts: 120
Likes: 0
From: North Adams, MA
When you did the spraying, what did you have to use to get the gun connected to the compressor? The gun that came with mine has threads at the end where the connector for the compressor usually is?

JK Enthusiast
Joined: May 2011
Posts: 135
Likes: 0
From: Toronto, Ontario
Originally Posted by mfmclain
When you did the spraying, what did you have to use to get the gun connected to the compressor? The gun that came with mine has threads at the end where the connector for the compressor usually is?
Thread Starter
JK Enthusiast
Joined: Oct 2011
Posts: 419
Likes: 2
From: Indy
It looks like below
Last edited by Rooster76; Jul 17, 2012 at 03:58 PM.
JK Enthusiast
Joined: May 2011
Posts: 135
Likes: 0
From: Toronto, Ontario
How much did you use to do the tub?
I want to do my 4 door and tuffy lid
Eventually I would like to do my poison spyder bumper and possibly wheels.
Should I buy two kits? Or was there plenty left?
I want to do my 4 door and tuffy lid
Eventually I would like to do my poison spyder bumper and possibly wheels.
Should I buy two kits? Or was there plenty left?
Thread Starter
JK Enthusiast
Joined: Oct 2011
Posts: 419
Likes: 2
From: Indy
I have heard of people only using 3 bottles on a 2 door but it would be a really thin 2nd coat. The kit is advertised as doing 125 square feet for a standard 8' truck bed. With my 2 door I think I had just enough left (that I sprayed in the footwells) were I could have done an unlimited with 2 coats. An extra bottle would be nice to have for the 2nd coat. When I was spraying I was sort of shocked about how fast it went. 1 bottle will cover about half a 2dr Jeep solid without the paint under showing. After 2 bottles for the first coat I had almost all the paint area covered well. The only area were it was a bit thin was in the deep recesses of the driver side foot well. If I was to do it again I would have sprayed the foot-wells, deep under the center console, deep in the jack area, and a light coat around the rear seat mount first with some rustolum rattle can bed liner. I basically did that with the spray can stuff after the first coat.
The kit I got comes with 4 bottles of base and 1 liter of hardener and the sprayer from TP Tools and Equipment part ME-820. There is also some kits floating around that don't have the gun so you need to be careful. Those kits are cheaper so if they come with hardener too that might be the way to go if you want extra. I saw the no gun kit one on amazon
No tt LINK-> h__p://www.amazon.com/Raptor-Truck-Bed-Liner-Black/dp/B002ANVF5E/ref=sr_1_1?ie=UTF8&qid=1342832620&sr=8-1
You can also get it by the bottle, but again remember you need 250ml (about a cup) of hardener per bottle.
NOTE: Honestly U-Pol doesn't make it easy to tell which kit has the gun and which doesn't. I would call up where ever you get it or at least make really sure the kit says it comes with the gun.
Last edited by Rooster76; Jul 20, 2012 at 05:41 PM.
 .
.
Thread Starter
JK Enthusiast
Joined: Oct 2011
Posts: 419
Likes: 2
From: Indy
I have been driving with the quadratec liners in the front (on top of tool drawer liner to stop them from slipping). With that set up I have had no problems with heat or slipping around.

I took the floor liners out today just to see what it's like without the floor mats. After driving for about an hour my feet started to get slightly warm. On a road trip I'm sure they would get pretty sweaty. It won't burn you hand touching the floor panels but it feels like you have the heater blowing on low. It's the worst right up by the gas pedal. It stays fairly warm where you rest your left foot. Under the front seats it's not really all that bad. It also was pretty warm where the rear heat goop was above the rear axle. It's not terrible but bad. If someone was riding with you I doubt they would notice toasty feet unless you pointed it out or they were barefoot.
To prevent this I have heard of a product called "Lizard Skin - Ceramic Insulation" that has an anti heat spray on product. I would use that or something like it before lining if no mats is one of your goals. It also comes in a sound dampening variety that I don't think you really need. I won't totally know about that until winter with the hard top on and window up.
http://www.youtube.com/watch?v=aUN61EzFaRA EDIT Since posting this I found this quote from post->https://www.jk-forum.com/forums/modi...1/#post3178556
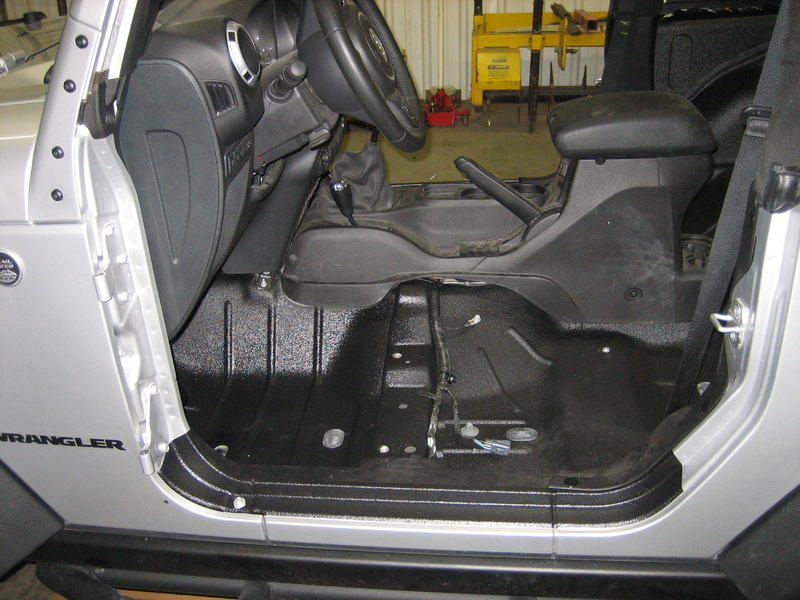
Another thing that I noticed is that because of some of the horizontal reinforcing ridges my left foot felt like it was slipping a bit with no mat. You can see the ridges in this picture below, they go across the floor and up the side. It make it where your foot is resting on these little ridges instead of being flat and having alot of traction. I've got running shoes with a good amount of tread and that doesn't help. The right foot felt really solid for what its worth.
Moral of the story is that your going to want some kind of mats most likely if you do this mod
I took the floor liners out today just to see what it's like without the floor mats. After driving for about an hour my feet started to get slightly warm. On a road trip I'm sure they would get pretty sweaty. It won't burn you hand touching the floor panels but it feels like you have the heater blowing on low. It's the worst right up by the gas pedal. It stays fairly warm where you rest your left foot. Under the front seats it's not really all that bad. It also was pretty warm where the rear heat goop was above the rear axle. It's not terrible but bad. If someone was riding with you I doubt they would notice toasty feet unless you pointed it out or they were barefoot.
To prevent this I have heard of a product called "Lizard Skin - Ceramic Insulation" that has an anti heat spray on product. I would use that or something like it before lining if no mats is one of your goals. It also comes in a sound dampening variety that I don't think you really need. I won't totally know about that until winter with the hard top on and window up.
http://www.youtube.com/watch?v=aUN61EzFaRA EDIT Since posting this I found this quote from post->https://www.jk-forum.com/forums/modi...1/#post3178556
Ty! Finally finished up the Lizard Skin today going to do a top coat of urethane tomorrow for some added protection and then move on to the top and doors.
And I talked with Paul (great guy) at Lizard Skin the ceramic coating is UV protected ! He also mentioned you really only want to use urethane as a top coat because putting another type of liner on top will encapsulate the heat and defeat the purpose of the ceramic liner.
PICTURE OF LIZARD SKIN
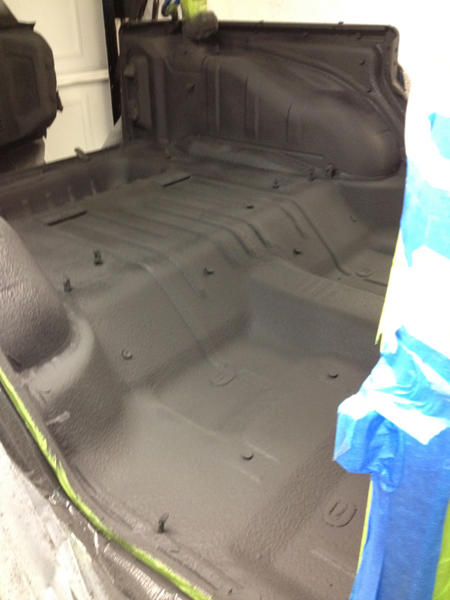
Here's a quick pic after two coats of sound control and two coats of ceramic liner
And I talked with Paul (great guy) at Lizard Skin the ceramic coating is UV protected
! He also mentioned you really only want to use urethane as a top coat because putting another type of liner on top will encapsulate the heat and defeat the purpose of the ceramic liner.PICTURE OF LIZARD SKIN
Here's a quick pic after two coats of sound control and two coats of ceramic liner
Moral of the story is that your going to want some kind of mats most likely if you do this mod
Last edited by Rooster76; Sep 19, 2012 at 01:24 PM.