
Bestop Underseat & InstaTrunk for a 2011- Install competed!!

Thread Starter
JK Super Freak
Joined: Mar 2009
Posts: 1,739
Likes: 0
From: Long Island NY
As part of a trade of some old parts, I picked up a Bestop Underseat Locking Storage Box.
But since I have a two door JK with the tumble front seats, there was no way to get the box installed because the seat rails are supported by steel cross members that interfere. Plus, research revealed that position of the holes in the boxes front mounting tabs were not lined up with the seat bolts. I pondered ways to install it. I thought about using spacers to raise the seat and hence the cross members up far enough to clear the box, but the tumble front seat has nice plastic trim along the bottom to cover the rails and spacers would make the trim look out of place.
I've posted a few times over the past few months, hoping someone had a solution and got a short response from one of our members with rough instructions for cutting the cross members and welding new ones up higher. Seemed like the way to go until I thought about eliminating the cross members and using the hardened steel security box as a structural piece.
If you've never removed the seat bolts, you're in for a surprise. They are torqued some un-goddly rating along with gorilla loctite and getting these bolts out is a real chore. I have air tools which helped but the left-rear bolt is in an awkward spot and there is no way to get an impact wrench or ratchet on it, so I ended up with some busted knuckles. No big deal.. been there and done that. Pain only hurts for a little while.
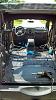
Here is the front cross member that blocks the path for sliding the box in. It is a corrugated steel piece which is quite rigid. Measure three times, cut once. It yielded to the almighty SawzAll.

Once the bar was out I tweaked the fit with an angle grinder and then stripped away the powder coating in preparation for welding.
With the bar removed...

There are two electric connections under the seat. If you have power and/or heated seats, you may have more. One of the two connectors just needs to be bent back about half an inch but the other needs to have it's bracket removed. SawzAll to the rescue. Afterwards, I deburred it.

The box now fits nearly between the remains of the front cross member, but the rear support needs to come out or the box won't slide all the way back.

This is as far as it will slide in before impacting the rear cross member. Also, a good look at all the extra sliders and levers needed for the tumble seat. I decided to simply cut the mounting tabs off the box since the welds were going to hold the box in place. Deburred what was left after removing the tabs.

This is the rear cross member.. a small diameter steel tube. No match for the reciprocal saw. I deburred it and removed the powder coating from the ends which both fit snugly against the sides of security box.

I did another test fit with the seat in the truck and marked exactly where the brackets would attach to the security box. Then removed it all and stripped the powder coat from the spots on the box that would be welded to the cross members.
Once again, measure three times... weld once. I clamped it in place and welded the two front and two rear support cross members to the sides of the security box. I am brand new to welding so my welds are pretty gnarly. One of the reasons I chose this install is to have some practice with welds that will be out of sight. After they cooled, I cleaned up the welds and hit all of them, plus all the cuts, as well as the exterior of the box with some Duplicolor BedLiner. The box was second hand and looked it, but we know what a fresh coat of bedliner can do..

..And, VIOLA' !!
With all the extra plastic trim replaced. Pretty much perfect. The seat slides, tilts, folds and tumbles exactly as it did prior to the install. The only negative is there is slightly less foot room under the seat if a passenger ever sat back behind me. But this is my second JK and I have had only one passenger in four years other than my eight year old daughter who sits on the other side. No harm, no foul.

Being able to weld opens up a whole new world of DIY mods.. I am really looking forward to them!!
But since I have a two door JK with the tumble front seats, there was no way to get the box installed because the seat rails are supported by steel cross members that interfere. Plus, research revealed that position of the holes in the boxes front mounting tabs were not lined up with the seat bolts. I pondered ways to install it. I thought about using spacers to raise the seat and hence the cross members up far enough to clear the box, but the tumble front seat has nice plastic trim along the bottom to cover the rails and spacers would make the trim look out of place.
I've posted a few times over the past few months, hoping someone had a solution and got a short response from one of our members with rough instructions for cutting the cross members and welding new ones up higher. Seemed like the way to go until I thought about eliminating the cross members and using the hardened steel security box as a structural piece.
If you've never removed the seat bolts, you're in for a surprise. They are torqued some un-goddly rating along with gorilla loctite and getting these bolts out is a real chore. I have air tools which helped but the left-rear bolt is in an awkward spot and there is no way to get an impact wrench or ratchet on it, so I ended up with some busted knuckles. No big deal.. been there and done that. Pain only hurts for a little while.
Here is the front cross member that blocks the path for sliding the box in. It is a corrugated steel piece which is quite rigid. Measure three times, cut once. It yielded to the almighty SawzAll.
Once the bar was out I tweaked the fit with an angle grinder and then stripped away the powder coating in preparation for welding.
With the bar removed...
There are two electric connections under the seat. If you have power and/or heated seats, you may have more. One of the two connectors just needs to be bent back about half an inch but the other needs to have it's bracket removed. SawzAll to the rescue. Afterwards, I deburred it.
The box now fits nearly between the remains of the front cross member, but the rear support needs to come out or the box won't slide all the way back.
This is as far as it will slide in before impacting the rear cross member. Also, a good look at all the extra sliders and levers needed for the tumble seat. I decided to simply cut the mounting tabs off the box since the welds were going to hold the box in place. Deburred what was left after removing the tabs.
This is the rear cross member.. a small diameter steel tube. No match for the reciprocal saw. I deburred it and removed the powder coating from the ends which both fit snugly against the sides of security box.
I did another test fit with the seat in the truck and marked exactly where the brackets would attach to the security box. Then removed it all and stripped the powder coat from the spots on the box that would be welded to the cross members.
Once again, measure three times... weld once. I clamped it in place and welded the two front and two rear support cross members to the sides of the security box. I am brand new to welding so my welds are pretty gnarly. One of the reasons I chose this install is to have some practice with welds that will be out of sight. After they cooled, I cleaned up the welds and hit all of them, plus all the cuts, as well as the exterior of the box with some Duplicolor BedLiner. The box was second hand and looked it, but we know what a fresh coat of bedliner can do..
..And, VIOLA' !!
With all the extra plastic trim replaced. Pretty much perfect. The seat slides, tilts, folds and tumbles exactly as it did prior to the install. The only negative is there is slightly less foot room under the seat if a passenger ever sat back behind me. But this is my second JK and I have had only one passenger in four years other than my eight year old daughter who sits on the other side. No harm, no foul.
Being able to weld opens up a whole new world of DIY mods.. I am really looking forward to them!!

JK Newbie
Joined: Jun 2011
Posts: 5
Likes: 0
From: Portland, ME
Hey MikekiM, nice work on this mod! Any chance you could provide an update? Any noise/squeaking from the seat since the install? I'm looking to try this with the tuffy version soon and was wondering how yours was holding up.
My only reluctance is that I recently had my seat base replaced under warranty due to noisy squeaking seat. Dealer isnt going to be impressed when they see i've hacked it up!
Thanks for any info and thanks for this write up!
My only reluctance is that I recently had my seat base replaced under warranty due to noisy squeaking seat. Dealer isnt going to be impressed when they see i've hacked it up!
Thanks for any info and thanks for this write up!
JK Enthusiast
Joined: May 2011
Posts: 439
Likes: 0
From: Altamonte Springs, FL
I installed that lock box yesterday on my 2011 JKU , I didn't have that cross member to deal with. But I did that that plug bracket to remove and reroute the wires. While I was at it I took all the seats out, carpet and Duplicolored the tub. Man, those seat bolts where a pain. Glad both projects are done now.
Trending Topics
JK Enthusiast
Joined: Oct 2011
Posts: 209
Likes: 0
From: Sioux Center, IA
Great writeup!!. I thought about doing this on my JKU just to push the box back under the seat further. My heels hit the front of the storage box. Great job and glad you STILL like it.
JeepJeremy
JeepJeremy