
Better back up lamp install

Thread Starter
JK Enthusiast
Joined: Mar 2007
Posts: 199
Likes: 0
From: Westminster, MD
It has been said the rear lights on a JK are a little lack luster. I for one would have to agree. I kicked around several ideas on how to add better lights. But knew I had to keep them out of harms way. The last thing I want is to rip them off every time I go wheeling. Here is how I resolved the problem.

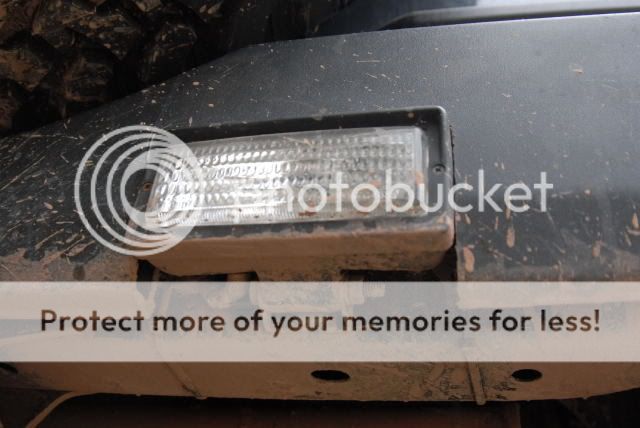
Buy integrating the lamps into the bumper. You can see how they�re not as susceptible to those �jumping rocks� that, like to damage everything they can.
Parts:
- KC rear back up lamp kit #517
- Two �� x 4� stainless steel carriage bolts.
- Two �� stainless steel washers
- Two �� stainless steel lock washers
- Two �� stainless steel nuts
Bumper trimming:
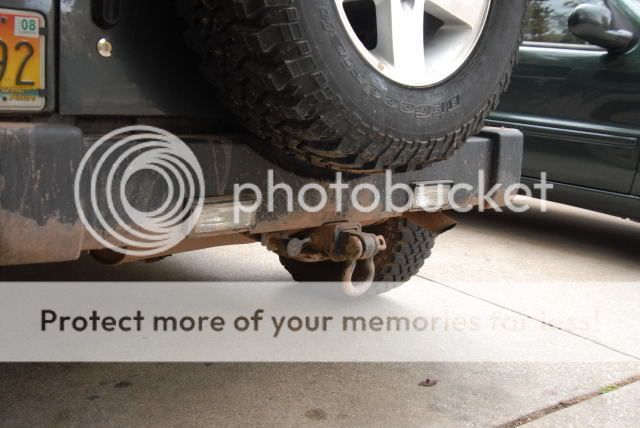
The first thing you need to worry about is where to notch the bumper. Looking under your Jeep you will note a few obstructions we need to keep clear of. The tail pipe for starters, taper of the rear crossmember (this is what we�ll bolt the lamps to), and the brackets to hold down the rear bumper. I measured 7�� from the outer edge of the lamps to the build out. This will keep everything safe and out of the way.
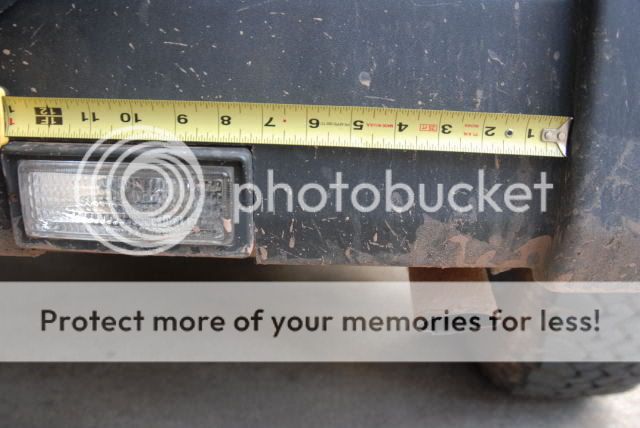
Next, use a Phillips head screwdriver and remove the bezel from one of the lamps. We will use this to measure the cut outs. Hold the bezel up to the 7�� mark. Draw the outline with a pencil. Make sure this is kept square with the top of the bumper. For better visibility while cutting. I used masking tape as a guide. By taping the outside edge of your cuts with it.
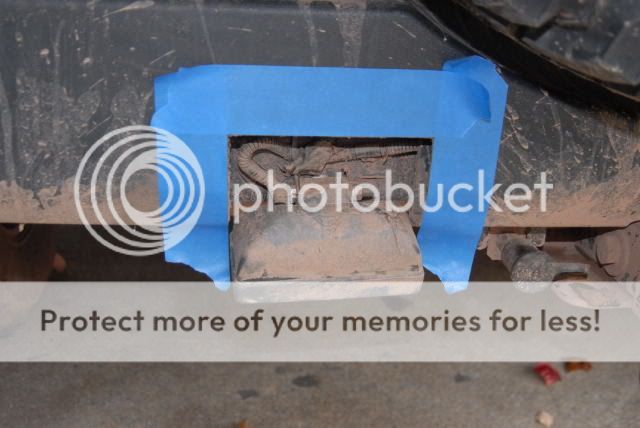
To cut the bumper I used an air powered cut off wheel. A dremel with a HD cut off disk can also be used. Remember measure twice and cut once!!! It is best to cut a little too small and sand out the difference. Once you make the first cut, slide the lamp into position for a test fit. Cut / sand as necessary for a snug fit. Keep in mind using a slower speed on your tool is best. The plastic will melt rather than cut if you use a high RPM.

Mounting:
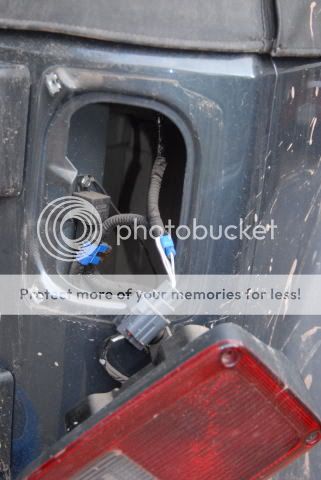
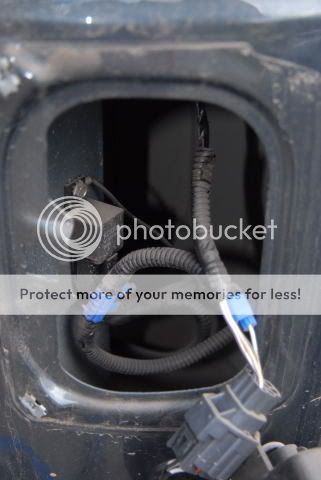
Now that the bumper has been prepped, we are ready to install the lamps. These photos illustrate how the lamps bolt thru the crossmember.

Start by removing the mounting brackets from the bottom of the lens. Set hardware aside. Now remove the small carriage bolt from the brackets. This bolt is too short. We will replace it later with the new 4� carriage bolt.
Time to drill the mounting hole. Mark a vertical line on the crossmember centered between the hole in the bumper. Take the mounting bracket and align the square hole over this line with the brackets bottom flush with the bottom of the crossmember. Mark the location of your hole. Use a 5/16ths bit and drill the hole all the way thru both sides of the crossmember. Now to make the proverbial square peg (carriage bolt) fit into a round hole. Take a small file and square off the hole on the outside of the crossmember. Spray the bare metal around the hole with primer or some kind of Rust-oleum to keep it from rusting out.
Using the new 4� carriage bolt, washers and nut, secure the mounting bracket. Reusing the factory hardware install the lamp assembly. We are installing the lamps upside down from there factory configurations. The lenses and bezels will need to be flipped upside down to shine light in the proper pattern. The factory instructions outline how this is done.
Wiring:
The Manual provides a complete write up on this. I�m not going to waste anyone�s time rehashing all the details. But here are a few JK specific notes.
-There is plenty of room behind the rear tail lamps for the relay. This will keep it dry and keeps the wire pulling to a minimum.
-The white wire in KC�s loom taps the factory back up lights. On my �07 and �05 Jeeps this is the white wire w/ a gray stripe.
-The power cable is green. This is easily routed under the Jeep. I followed the trailer wiring harness to the battery. However, my trailer hitch was installed by the dealer not the factory. So take that for what it is worth.
-I added a second control circuit to KC�s design. This allows me to turn them on even when not in reverse gear. (I am going to add more info on that later)
If anyone has any questions please let me know.
Buy integrating the lamps into the bumper. You can see how they�re not as susceptible to those �jumping rocks� that, like to damage everything they can.
Parts:
- KC rear back up lamp kit #517
- Two �� x 4� stainless steel carriage bolts.
- Two �� stainless steel washers
- Two �� stainless steel lock washers
- Two �� stainless steel nuts
Bumper trimming:
The first thing you need to worry about is where to notch the bumper. Looking under your Jeep you will note a few obstructions we need to keep clear of. The tail pipe for starters, taper of the rear crossmember (this is what we�ll bolt the lamps to), and the brackets to hold down the rear bumper. I measured 7�� from the outer edge of the lamps to the build out. This will keep everything safe and out of the way.
Next, use a Phillips head screwdriver and remove the bezel from one of the lamps. We will use this to measure the cut outs. Hold the bezel up to the 7�� mark. Draw the outline with a pencil. Make sure this is kept square with the top of the bumper. For better visibility while cutting. I used masking tape as a guide. By taping the outside edge of your cuts with it.
To cut the bumper I used an air powered cut off wheel. A dremel with a HD cut off disk can also be used. Remember measure twice and cut once!!! It is best to cut a little too small and sand out the difference. Once you make the first cut, slide the lamp into position for a test fit. Cut / sand as necessary for a snug fit. Keep in mind using a slower speed on your tool is best. The plastic will melt rather than cut if you use a high RPM.
Mounting:
Now that the bumper has been prepped, we are ready to install the lamps. These photos illustrate how the lamps bolt thru the crossmember.
Start by removing the mounting brackets from the bottom of the lens. Set hardware aside. Now remove the small carriage bolt from the brackets. This bolt is too short. We will replace it later with the new 4� carriage bolt.
Time to drill the mounting hole. Mark a vertical line on the crossmember centered between the hole in the bumper. Take the mounting bracket and align the square hole over this line with the brackets bottom flush with the bottom of the crossmember. Mark the location of your hole. Use a 5/16ths bit and drill the hole all the way thru both sides of the crossmember. Now to make the proverbial square peg (carriage bolt) fit into a round hole. Take a small file and square off the hole on the outside of the crossmember. Spray the bare metal around the hole with primer or some kind of Rust-oleum to keep it from rusting out.
Using the new 4� carriage bolt, washers and nut, secure the mounting bracket. Reusing the factory hardware install the lamp assembly. We are installing the lamps upside down from there factory configurations. The lenses and bezels will need to be flipped upside down to shine light in the proper pattern. The factory instructions outline how this is done.
Wiring:
The Manual provides a complete write up on this. I�m not going to waste anyone�s time rehashing all the details. But here are a few JK specific notes.
-There is plenty of room behind the rear tail lamps for the relay. This will keep it dry and keeps the wire pulling to a minimum.
-The white wire in KC�s loom taps the factory back up lights. On my �07 and �05 Jeeps this is the white wire w/ a gray stripe.
-The power cable is green. This is easily routed under the Jeep. I followed the trailer wiring harness to the battery. However, my trailer hitch was installed by the dealer not the factory. So take that for what it is worth.
-I added a second control circuit to KC�s design. This allows me to turn them on even when not in reverse gear. (I am going to add more info on that later)
If anyone has any questions please let me know.
JK Jedi Master


Joined: Mar 2007
Posts: 14,800
Likes: 374
From: Midwest City, OK
That's great! I have some friends whose home has a long driveway that curves and goes uphill and is lined on both sides by trees. I can hardly see at night because of the grade of the hill, and the tinted glass on the JK. I might just have to do this so I don't do a Curtis (my son) on my spare tire rack! 
BTW: Do these lights replace the stock back-up lamps, or do the stock back-up lamps also illuminate?
BTW: Do these lights replace the stock back-up lamps, or do the stock back-up lamps also illuminate?
Thread Starter
JK Enthusiast
Joined: Mar 2007
Posts: 199
Likes: 0
From: Westminster, MD

JK Jedi Master
Joined: Mar 2007
Posts: 14,800
Likes: 374
From: Midwest City, OK

JK Enthusiast
Joined: Feb 2007
Posts: 183
Likes: 0
From: Kansas
Nice. I like this version.
I was worried with the last version (that i now believe is a no content post since somone removed the writeup info) positioned the lights so they hung too low. this protects the lights a bit more. I like.
^^^I would like to see this^^^
I was worried with the last version (that i now believe is a no content post since somone removed the writeup info) positioned the lights so they hung too low. this protects the lights a bit more. I like.
I added a second control circuit to KC’s design. This allows me to turn them on even when not in reverse gear. (I am going to add more info on that later)

Trending Topics
JK Super Freak
Joined: May 2007
Posts: 1,153
Likes: 0
From: Shreveport,LA
I would like a little more info on the extra wiring that you did to put them on a switchable source. I have talked to ya awhile back about these lights. I am just mounting them underneath for now. Please PM me with some more details though. I am not electrically inclined by any means
Thanks
Andrew
Thanks
Andrew