
OR-Fab tire carrier install


JK Enthusiast
Joined: Mar 2007
Posts: 400
Likes: 0
From: Phoenix, AZ
Finished my install today. The hardest part so far was grinding the hinges for clearance. I over cleared them... should have been checking with the actual bolt and 13MM wrench and not just the wrench. No big deal, just extra work for me.
Angle Drill from Harbor Freight $29 Sale (normal $36)... China built, but how much do you have to use it anyway.

I have some pictures I'll post of the cheapo angle drill and a crayon in action. :-)
Look cool so far!
Angle Drill from Harbor Freight $29 Sale (normal $36)... China built, but how much do you have to use it anyway.
I have some pictures I'll post of the cheapo angle drill and a crayon in action. :-)
Look cool so far!
JK Enthusiast
Joined: Mar 2007
Posts: 400
Likes: 0
From: Phoenix, AZ
Everything went a-ok. I did it solo, no major problems. I was concerned about hitting the driver side holes correctly for the brace, so I put the support in with the tip of a yellow (of course ) crayon:
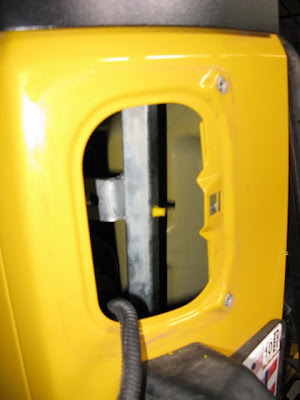
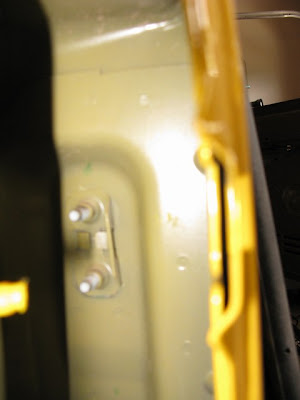
Which showed me where to drill in relation to the rivets for the top mount (this is a picture inside the driver's tail light and you can see the mark not quite 1/2 way up and off to the left between the rivets:
So I drilled from where I judged the hole to be, and bulls eye (turned out to be at 10 and 3/8:
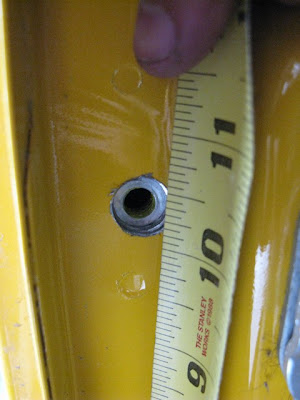
I measured down 7 inches and hit the bottom hole.
Next tough one was the hold though the body from the back side:
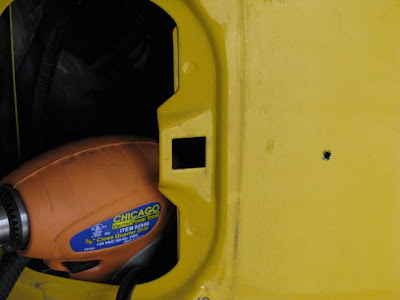
You can see the cheapo drill I used and the pilot hole. One note I'd like to make is be 100% sure you drill in the middle of the brace hole. I was off about a 32nd of an inch which caused my 1'in body hole to be off just enough where I had to take a manual file and file that amount away on the bottom of the hole. PITA! Not a big deal, but will save you some time.
The last hole I had to drill which caused a small problem was on the passenger side up though the body for the last brace. The cheapo angle drill just couldn't get the angle, so I used my big impact drill which is really long and was able to fit though the hole in the bottom of the Jeep(it's a straight shoot from the beneath the Jeep). Easy hole, but something to be aware of.
I would say this install took me about 8 hours over 2 days. I'll bet I could have cut it down to 6 if I didn't over clearance the hinges and the pilot hole issue.
Love the rack though!
) crayon:Which showed me where to drill in relation to the rivets for the top mount (this is a picture inside the driver's tail light and you can see the mark not quite 1/2 way up and off to the left between the rivets:
So I drilled from where I judged the hole to be, and bulls eye (turned out to be at 10 and 3/8:
I measured down 7 inches and hit the bottom hole.
Next tough one was the hold though the body from the back side:
You can see the cheapo drill I used and the pilot hole. One note I'd like to make is be 100% sure you drill in the middle of the brace hole. I was off about a 32nd of an inch which caused my 1'in body hole to be off just enough where I had to take a manual file and file that amount away on the bottom of the hole. PITA! Not a big deal, but will save you some time.
The last hole I had to drill which caused a small problem was on the passenger side up though the body for the last brace. The cheapo angle drill just couldn't get the angle, so I used my big impact drill which is really long and was able to fit though the hole in the bottom of the Jeep(it's a straight shoot from the beneath the Jeep). Easy hole, but something to be aware of.
I would say this install took me about 8 hours over 2 days. I'll bet I could have cut it down to 6 if I didn't over clearance the hinges and the pilot hole issue.
Love the rack though!
Last edited by Foo; Sep 7, 2009 at 10:33 PM.
JK Super Freak
Joined: Mar 2008
Posts: 1,439
Likes: 1
From: Flyover Country
Nice job, Foo. I have seven hours in my OR-Fab installation and I'm a pretty competent mechanic. It's not something for the faint of heart and you do need a few oddball tools such as a right-angle drill (I got a right-angle drill attachment that goes in any 3/8" electric drill from Harbor for $19 IIRC - it sufficed). If a guy is willing to take his time and, above all, adopt a measure twice then measure again/drill once mantra, it's a superb piece of engineering. Looks great, works great.
JK Junkie
Joined: Mar 2008
Posts: 2,113
Likes: 2
From: St. Louis MO.

You have got the sweetest rig with the tent set up and everything!!!
Red
ORfab Rocks!!!!!!!!!!!
Last edited by TheonlyREDhead 2008 JK; Sep 13, 2009 at 06:38 AM.
JK Enthusiast
Joined: Jul 2009
Posts: 158
Likes: 0
From: San Diego, CA
Thanks to the help listed on this thread, I completed mine last night!!!
I was thinking this was going to be more difficult than it turned out..........wasn't too bad at all, just take your time marking and drilling holes, other than the time it took, it was actually easy.......took about 4 hours of off and on work to get it done...........


I was thinking this was going to be more difficult than it turned out..........wasn't too bad at all, just take your time marking and drilling holes, other than the time it took, it was actually easy.......took about 4 hours of off and on work to get it done...........

