ToughStuff Hi-lift Hood Mount
 05-25-2008, 12:38 PM
#1
JK Jedi Master


Thread Starter
I installed the ToughStuff Hi-lift hood mount on my JK. This is an easy install, and the instructions that come with the product are more than adequate. This write-up is primarily to assist those who are considering buying the rack, or who might be interested in building their own (I should think it would be quite easy). For the record, I bought mine from a local supplier listed on the ToughStuff website, Supplee 4x4 in Oklahoma City. Other places had the rack listed for $130, but he quoted me $115 on the phone. When I arrived (first purchase there), we had a great time talking about four wheeling in Moab (his daughter has lived there for several decades, so he's a regular), and he ultimately charge me only $105 for the rack. YMMV if you should call him up.
Here are the parts that come in the box. Note that this rack can also be used to mount an axe and shovel on the hood instead of the Hi-lift, so you will have parts left over after the install.

The printed instruction sheet did not have this as an instruction, but one for earlier model Jeeps I read online suggested placing a magazine on each side of the hood to protect it when the hinges are released. I thought it was a good idea, but just substituted some shop rags.

Remove the two T50 Torx bolts that hold each of the hinges (four bolts total). These were a bit tough to turn, so having a breaker bar may come in handy (you wouldn't want the wrench to slip out of the bolt and to go skidding across the surface. Speaking of which, this hood suffered a couple weeks ago during a hail storm, so don't be surprised if you see that in the images).

Lift up the hinge on each side. Mine were stuck pretty firmly, so I used a line-up tool to jiggle things around in each Torx bolt hole and free things up.

Install the new right-angle bracket between the hood and the upraised hinge.

Lower the hinge onto the new bracket, then install and tighten the old Torx bolts.

The thickness of the new bracket will lower the hood about 1/8". I decided to readjust it a little higher. Use a 13-mm wrench to loosen the two bolts for each bracket. One side was frozen, but I was able to free it up by carefully opening the hood and jiggling things around.

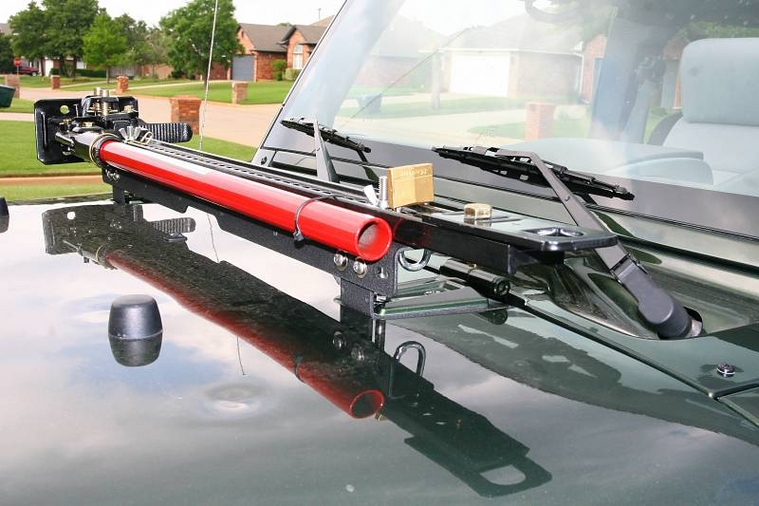
Using four 3/4" long Allen head bolts and Nyloc nuts, install the crossbar (called an angle bar in the printed directions) so that it's facing as shown below (it faces the other way for the lighter weight of an axe/shovel). Two washers are provided for each bolt if you need to move the crossbar forward to provide clearance for the windshield sprayer. Not having my top on, I decided to just mount these on the bolt, and can move them between the crossbar and the bracket at a later time if the sprayer hits anything. Now, the two 4" bolts will need to be assembled onto the crossbar as shown. Ultimately, these bolts will be supporting the weight of the rack and Hi-lift directly to the top of two of the OEM hood mounting screws (yes, directly against the painted surface of those Torx bolts). You will need to adjust the lower nut to force the head of the 4" bolt against the head of the OEM Torx bolt. Then tighten up the upper nut to snug the assembly into place. As you tighten both bolts up, be aware that the holes in your Hi-lift must line up with each bolt, so check that before doing the final bit of tightening. Follow the printed directions carefully, since they provide a few more pic's/instructions for these parts than I have.

Your rack is ready for the Hi-lift. I suggest that you have someone help you heft it into place--it's awkward, so you run the risk of both injuring your back (reaching out holding a heavy load), and damaging the hood. Use four washers and two wingnuts to secure the Hi-Lift in place. I found that a bicycle lock also fits nicely through the holes to insure the Hi-lift doesn't walk off. Also, secure the Hi-lift handle with a zip-tie and, while you're at it, place one or two into your glove box (for the next time you cut one off).
As promised, there will be parts left over.

This thing looks great!

Edit: Corrected typo.
Here are the parts that come in the box. Note that this rack can also be used to mount an axe and shovel on the hood instead of the Hi-lift, so you will have parts left over after the install.
The printed instruction sheet did not have this as an instruction, but one for earlier model Jeeps I read online suggested placing a magazine on each side of the hood to protect it when the hinges are released. I thought it was a good idea, but just substituted some shop rags.
Remove the two T50 Torx bolts that hold each of the hinges (four bolts total). These were a bit tough to turn, so having a breaker bar may come in handy (you wouldn't want the wrench to slip out of the bolt and to go skidding across the surface. Speaking of which, this hood suffered a couple weeks ago during a hail storm, so don't be surprised if you see that in the images).
Lift up the hinge on each side. Mine were stuck pretty firmly, so I used a line-up tool to jiggle things around in each Torx bolt hole and free things up.
Install the new right-angle bracket between the hood and the upraised hinge.
Lower the hinge onto the new bracket, then install and tighten the old Torx bolts.
The thickness of the new bracket will lower the hood about 1/8". I decided to readjust it a little higher. Use a 13-mm wrench to loosen the two bolts for each bracket. One side was frozen, but I was able to free it up by carefully opening the hood and jiggling things around.
Using four 3/4" long Allen head bolts and Nyloc nuts, install the crossbar (called an angle bar in the printed directions) so that it's facing as shown below (it faces the other way for the lighter weight of an axe/shovel). Two washers are provided for each bolt if you need to move the crossbar forward to provide clearance for the windshield sprayer. Not having my top on, I decided to just mount these on the bolt, and can move them between the crossbar and the bracket at a later time if the sprayer hits anything. Now, the two 4" bolts will need to be assembled onto the crossbar as shown. Ultimately, these bolts will be supporting the weight of the rack and Hi-lift directly to the top of two of the OEM hood mounting screws (yes, directly against the painted surface of those Torx bolts). You will need to adjust the lower nut to force the head of the 4" bolt against the head of the OEM Torx bolt. Then tighten up the upper nut to snug the assembly into place. As you tighten both bolts up, be aware that the holes in your Hi-lift must line up with each bolt, so check that before doing the final bit of tightening. Follow the printed directions carefully, since they provide a few more pic's/instructions for these parts than I have.
Your rack is ready for the Hi-lift. I suggest that you have someone help you heft it into place--it's awkward, so you run the risk of both injuring your back (reaching out holding a heavy load), and damaging the hood. Use four washers and two wingnuts to secure the Hi-Lift in place. I found that a bicycle lock also fits nicely through the holes to insure the Hi-lift doesn't walk off. Also, secure the Hi-lift handle with a zip-tie and, while you're at it, place one or two into your glove box (for the next time you cut one off).
As promised, there will be parts left over.
This thing looks great!
Edit: Corrected typo.
Last edited by Mark Doiron; 06-20-2008 at 06:38 AM.

 05-25-2008, 06:51 PM
#4
Mark, that looks great. How bout a pic from the driver's seat lookin out the windshield? I'd like to see if it obstructs the view at all. I'm kinda picky about havin any of my windshield space taken up. Thanks.
05-26-2008, 06:17 AM
#5
JK Super Freak
Join Date: Oct 2007
Location: Dallas, Texas, United States
Posts: 1,640
Likes: 0
Received 0 Likes
on
0 Posts
And does it have any whistling or air flow noise up on the hood like that?
It looks great.
05-26-2008, 07:58 AM
#6
JK Jedi Master
Thread Starter

No whistling or other noise that I can hear while driving around without the doors and top. Of course, I have tinnitus in my left ear, so I always hear a little bit of whistling when it's otherwise quiet.
05-26-2008, 10:13 AM
#7
Mark, you're a gentleman and a scholar. Thanks. That doesn't look like it takes anything away from the view. I said it before and I'll say it again. You're a cool old dude. I know how I will mount mine now. Thanks again.
