
Winch mount W/factory bumper


JK Enthusiast


Joined: Jan 2013
Posts: 211
Likes: 1
From: Spanaway WA
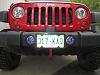
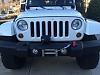
Holy cow was this a job, but she looks good and she works.
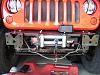
A lot of cutting on the winch plate and bumper for everything to fit with clearance. The only cutting on the Jeep was to trim a 1/4" off of the top and enlarging a hole for wrench clearance on the plates the bumper bolts to, and a piece out of the crossmember to clear the spool lever. I relocated the purge valve by cutting off the stock bracket, drilling 2 holes in it and the crossmember, and then mounting it to the member.
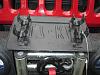
At first, I just slapped it together as I needed the weight on the front for a big trip. I had ran out of time for a good install while prepping as I just finished a 6 week solo house reroofing with weather delays prolonging the agony. I took it all off post trip to cut some more on the winch plate so I could get a socket on the upper inner bumper nuts, unjam the cable between the fairlead and winch plate, and wire up the solenoid box. My body hates me now!

A lot of cutting on the winch plate and bumper for everything to fit with clearance. The only cutting on the Jeep was to trim a 1/4" off of the top and enlarging a hole for wrench clearance on the plates the bumper bolts to, and a piece out of the crossmember to clear the spool lever. I relocated the purge valve by cutting off the stock bracket, drilling 2 holes in it and the crossmember, and then mounting it to the member.
At first, I just slapped it together as I needed the weight on the front for a big trip. I had ran out of time for a good install while prepping as I just finished a 6 week solo house reroofing with weather delays prolonging the agony. I took it all off post trip to cut some more on the winch plate so I could get a socket on the upper inner bumper nuts, unjam the cable between the fairlead and winch plate, and wire up the solenoid box. My body hates me now!


JK Newbie
Joined: Aug 2014
Posts: 1
Likes: 0
From: Golden, Colorado
After seeing others doing this modification, Kudos to all who have posted on their projects. You are all inspirations to why I decided to do mine and assisted in my preparation to tackle this as my 1st big project on the jeep. 
Well, this was a Project. Little here and a Little there till I had what I wanted. I think I had the Bumper on and off 10 or so times throughout the project.
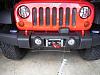
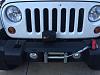
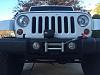
Looking at the different applications others have done , I know I liked the Hidden appearance but still preferred having the Control Box on the Bumper.
I did not want to use spacers in between the Fairlead and the Winch plate. This was a great fir when all cut out although, the only problem I had was that I did not take into consideration the connecting Harness on the back of the Stock fog lights. mounting it back 1" on the rails from the frame rail end plates would have corrected this but would need spacers on the Fairlead.
Parts Used:
- SmittyBuilt 9500 LB Winch
- 4 Wheel Parts Winch Plate - Not using the Harbor freight plate Removed all Need of Cutting the Winch Plate for any Fitment.
- 6 ea. Grade 8 Bolts for mounting to the Frame Rails
- 4 Ea. Maglight Snap Clamps
- AutoZone - Plastic License Plate Frame
- Stainless Bolts and nuts to mount the Clamps to the Plastic License plate frame.
- 3 ea aluminum 3/8 spacers used in conjunction with Smittybuilt spacers for Control box mount
- 1 1/2 inch metal band pieces for mounting the vacuum pump
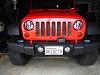
- Pilot 4" Driving / Fog Lights - Stock Fogs were hitting the winch and could not connect wire harness.
- Rustoleum Flat Black spray paint
- 3/4 Front Spring Spacer to alleviate the Additional Rake from the weight on stock springs. Actually Leveled the Jeep out and Looks Great!
Tools Used:
- 4 1/2 Side grinder
- 2 ea. 4 1/2" Cutting Discs
- Box End Wrench - Inside Frame Rails to hold nuts
- Socket wrench - 18 mm Socket - Bumper Removal
- Utility Knife - Cutting the Bumper
- Metal Straight edge for Reference for Knife.
Time Spent
- Combined time of about 20 hours est.
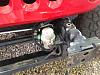
I had to relocate the Vacuum pump to under the hood and extender the wires from below to achieve this.
Having the pump under the hood now enhances the Vibrating noise you did not hear before when the pump was on the bumper. This is a Minor 10 - 15 second annoyance when you turn the vehicle on. Its just an Echo.
I have many pictures but can only add 5 to the post? I would recommend this as a good project to do if you have some mechanical experience. It is not overly complicated but is time consuming and when completed have earned this...


Well, this was a Project. Little here and a Little there till I had what I wanted. I think I had the Bumper on and off 10 or so times throughout the project.
Looking at the different applications others have done , I know I liked the Hidden appearance but still preferred having the Control Box on the Bumper.
I did not want to use spacers in between the Fairlead and the Winch plate. This was a great fir when all cut out although, the only problem I had was that I did not take into consideration the connecting Harness on the back of the Stock fog lights. mounting it back 1" on the rails from the frame rail end plates would have corrected this but would need spacers on the Fairlead.
Parts Used:
- SmittyBuilt 9500 LB Winch
- 4 Wheel Parts Winch Plate - Not using the Harbor freight plate Removed all Need of Cutting the Winch Plate for any Fitment.
- 6 ea. Grade 8 Bolts for mounting to the Frame Rails
- 4 Ea. Maglight Snap Clamps
- AutoZone - Plastic License Plate Frame
- Stainless Bolts and nuts to mount the Clamps to the Plastic License plate frame.
- 3 ea aluminum 3/8 spacers used in conjunction with Smittybuilt spacers for Control box mount
- 1 1/2 inch metal band pieces for mounting the vacuum pump
- Pilot 4" Driving / Fog Lights - Stock Fogs were hitting the winch and could not connect wire harness.
- Rustoleum Flat Black spray paint
- 3/4 Front Spring Spacer to alleviate the Additional Rake from the weight on stock springs. Actually Leveled the Jeep out and Looks Great!
Tools Used:
- 4 1/2 Side grinder
- 2 ea. 4 1/2" Cutting Discs
- Box End Wrench - Inside Frame Rails to hold nuts
- Socket wrench - 18 mm Socket - Bumper Removal
- Utility Knife - Cutting the Bumper
- Metal Straight edge for Reference for Knife.
Time Spent
- Combined time of about 20 hours est.
I had to relocate the Vacuum pump to under the hood and extender the wires from below to achieve this.
Having the pump under the hood now enhances the Vibrating noise you did not hear before when the pump was on the bumper. This is a Minor 10 - 15 second annoyance when you turn the vehicle on. Its just an Echo.
I have many pictures but can only add 5 to the post? I would recommend this as a good project to do if you have some mechanical experience. It is not overly complicated but is time consuming and when completed have earned this...
Last edited by JKWalker001; Oct 12, 2014 at 10:11 AM.
JK Newbie

Joined: Nov 2013
Posts: 52
Likes: 0
Finally finished mine! Took a couple of weeks to get it done and I had to do a bit more cutting then others did. Still want to change the control box to a different location more hidden but I need to buy some longer wires. It didn't come out perfect but it does work and saved me from buying a bumper.
Sent from my iPad using JK-Forum
Sent from my iPad using JK-Forum

JK Enthusiast
Joined: May 2014
Posts: 349
Likes: 0
Great stuff! Had to let the front page know about it...
Building the Perfect Winch - JK Forum
Building the Perfect Winch - JK Forum
JK Newbie
Joined: Jan 2015
Posts: 1
Likes: 0
From: Upstate-South Carolina
Hey fellas, I am new to the forum, but I did come across this sick thread!!  But anyways, for you fellas who have done this what type of winch would suggest? I'm thinking about doing this until I get the coin to buy a full width bumper but I am unsure what winch would be best. I am leaning towards the Smittybilt X20-10 with the synthetic line but was unsure of the quality of the winch considering Smittybilt isn't the most highly regarded brand out there. Kind of in summary im not necessary looking for advice on any particular brand but rather what size winch would be best for such a small space? Obviously one with the integrated solenoid would be a pain because of all the extra trimming, so would something like the Smittybilt be ideal?
But anyways, for you fellas who have done this what type of winch would suggest? I'm thinking about doing this until I get the coin to buy a full width bumper but I am unsure what winch would be best. I am leaning towards the Smittybilt X20-10 with the synthetic line but was unsure of the quality of the winch considering Smittybilt isn't the most highly regarded brand out there. Kind of in summary im not necessary looking for advice on any particular brand but rather what size winch would be best for such a small space? Obviously one with the integrated solenoid would be a pain because of all the extra trimming, so would something like the Smittybilt be ideal?
JK Newbie
Joined: Nov 2013
Posts: 52
Likes: 0
I just bought the
XRC-9.5K Waterproof Winch Gen2 since it was the cheapest and not planning on using it a ton. I will upgrade to synthetic line eventually. It's on the smaller side so it fits behind the bumper easy enough.
Sent from my iPad using JK-Forum
XRC-9.5K Waterproof Winch Gen2 since it was the cheapest and not planning on using it a ton. I will upgrade to synthetic line eventually. It's on the smaller side so it fits behind the bumper easy enough.
Sent from my iPad using JK-Forum


